


Entretien
ATTENTION : Afin d’éviter de graves brûlures, laisser refroidir
l’appareil complètement avant de le nettoyer.
1. Avant de procéder au nettoyage, tournez les variateurs de
température gauche (gril) et droit (plaque à frire) à la position d’arrêt
(OFF). Débranchez le cordon électrique de la prise murale.
ATTENTION : Pour éviter de provoquer une étincelle dans la prise
murale lorsque vous débranchez l’appareil, assurez-vous au
préalable que les témoins lumineux sont éteints.
2. Nettoyage des plaques de cuisson : Placez le bac d’égouttement
sous l’avant du gril. À l’aide de la spatule en matière plastique
fournie, grattez tous résidus de graisse et les particules d’aliments.
Essuyez les surface de cuisson du gril et de la plaque à frire avec du
papier essuie-tout ou une éponge.
3. Résidus tenaces : Si nécessaire, passez un tampon à récurer non
métallique sur la plaque à frire et une brosse dure mais non
métallique dans les cannelures du gril. N’utilisez jamais de laine
d’acier ni de tampons et autres produits abrasifs sur les surfaces du
gril et de la plaque à rôtir.
4. Videz le bac d’égouttement et lavez-le à l’eau chaude savonneuse,
puis essuyez-le.
5. Nettoyage des surfaces extérieures : Passez une éponge légèrement
imprégnée d’eau chaude savonneuse sur l’appareil, puis séchez-le
avec un chiffon doux et sec.
6. N’utilisez jamais de laine d’acier ni de tampons ou de produits
abrasifs sur les surfaces de l’appareil.
7. NE JAMAIS PLONGER L’APPAREIL DANS UN LIQUIDE !
8. Mis à part les opérations de nettoyage décrites ci-dessus, toute
opération d’entretien nécessitant un démontage de l’appareil doit
être confiée à réparateur qualifié.
9. Pendant le nettoyage, retenez toujours le couvercle du gril, de
manière à éviter qu’il ne se referme brutalement sur vos mains.
10
7
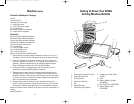
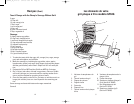
How To Use George Foreman’s Lean Mean
Fat Reducing Grilling Machine/ Griddle
1. Before using this appliance for the first time, wipe the Grilling Plates and
the Griddle Surface with a damp cloth to remove all dust. Wash the Drip
Tray and Spatulas in warm, soapy water. Rinse thoroughly and wipe dry.
2. To preheat: Turn the left hand Temperature Control Dial (Grill) and the right
hand Temperature Control Dial (Griddle) to OFF. Plug the cord into a 120V AC
outlet then close the Lid on the Grilling side of the unit. If you are using the
Grilling surface, turn the Temperature Control Dial on the Grill side to MIN,
MED or MAX, according to your cooking needs and allow it to preheat until
the power light goes off. If you are using the Griddle surface, turn the
Temperature Control Dial on the Griddle side to MIN, MED or MAX, accord-
ing to your cooking needs and allow it to preheat until the power light goes
off. Since each side of the Grill/Griddle has independent controls and heat-
ing elements, you may use each side at a different temperature, or set each
side to the same temperature, if preferred. Note that when the elements are
heating, the Power On Lights illuminate. They will remain ON until the set
temperature has been reached then cycle on and off as the set tempera-
ture is being maintained.
3. Use a pot holder to carefully open the Lid.
4. Slide the grease catching Drip Tray under the front of the unit.
5. Carefully place the items to be cooked on the bottom Grilling Plate or the
Griddle Surface.If using the Grill, use a pot holder to carefully close the Lid.
6. Allow the food to cook for the desired time. (Consult the recipe section at
the back of this book for some suggestions). Do not leave appliance unat-
tended during use!
7. After the desired amount of time, the food should be done.
8. If using the Grill, use a pot holder to carefully open the Lid.
9. Remove the food using the Plastic Spatula provided. Be sure to always use
either plastic or wooden utensils so as not to scratch the non-stick surface.
Never use metal tongs, forks or knives as these can damage the coating on
the cooking plates.
10. When finished, turn Temperature Control Dials to OFF. Disconnect the plug
from the wall outlet and let the appliance cool completely.
CAUTION: To avoid any sparks at the outlet while disconnecting plug,
make sure the "Power-On Lights" are off (not illuminated) before discon-
necting the plug from the outlet.
11. When cool, the Drip Tray may be removed and emptied. Be sure the liquid
has cooled before removing Drip Tray.
GR_GF64G_IB_27-6-06 6/27/06 5:23 PM Page 13