


18
®
Once the unit has been put into
operation, a routine
maintenance program should
be set up to preserve reliability
and performance. Items to be
included in this program are:
• Lubrication
• Dampers
• Fan Belts
• Motors
• Wheel & Fasteners
• Bearings
• Filter Maintenance
• Coil Maintenance
• Energy Wheel Cassette
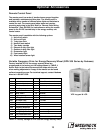
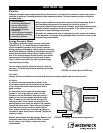
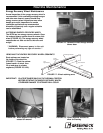
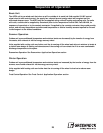
FIGURE 22: Proper fan belt settings
B
e
l
t
S
p
a
n
D
e
f
l
ec
t
i
o
n
=
B
e
l
t
S
p
a
n
64
The proper belt setting is the lowest tension at
which the belts will not slip under peak load
operation (see FIGURE 22). For initial tensioning,
set the belt deflection at
1
⁄
64-inch for each inch of
belt span (measured half-way between sheave
centers). For example, if the belt span is 64 inches,
the belt deflection should be 1 inch (using
moderate thumb pressure at mid-point of the
drive). Check belt tension two times during the first
24 hours of operation and periodically thereafter
.
Fan Belts
Belts must be checked on a regular basis for wear, tension, alignment, and dirt accumulation. Premature or
frequent belt failures can be caused by improper belt tension (either too loose or too tight) or misaligned
sheaves. Abnormally high belt tension or drive misalignment will cause excessive bearing loads and may result
in failure of the fan and/or motor bearings. Conversely, loose belts will cause squealing on start-up, excessive
belt flutter, slippage, and overheated sheaves. Both loose and tight belts can cause fan vibration.
When replacing belts on multiple groove drives, all belts should be changed to provide uniform drive loading.
Do not pry belts on or off the sheave. Loosen belt tension until belts can be removed by simply lifting the belts
off the sheaves. After replacing belts, ensure that slack in each belt is on the same side of the drive. Belt
dressing should never be used.
Do not install new belts on worn sheaves. If the sheaves have grooves worn in them, they must be replaced
before new belts are installed.
Lubrication
Check all moving components for proper lubrication. Apply lubrication where required. Any components
showing excessive wear should be replaced to maintain the integrity of the unit and ensure proper operation.
Dampers
Check all dampers to ensure they open and close properly and without binding. Backdraft dampers can be
checked by hand to determine if blades open and close freely. Apply power to motorized dampers to ensure
the actuator opens and closes the damper as designed.
Routine Maintenance
SAFETY CAUTION!
Use caution when removing access panels or other
unit components, especially while standing on a
ladder or other potentially unsteady base. Access
panels and unit components can be heavy and
serious injury may occur.
SAFETY DANGER!
Electric shock hazard. Can cause injury or death.
Before attempting to perform any service or
maintenance, turn the electrical power to unit to OFF
at disconnect switch(es). Unit may have multiple
power supplies.