


– 12 –
FORM 35219 (Oct. 2007)
MAINTENANCE
Unplug the machine power cord and turn the index knob fully clockwise to
close the gauge plate before doing any maintenance on the slicer.
KNIFE SHARPENING
The CleanCut
TM
KNIFE will provide long service in normal food retail or commercial kitchen use.
Sharpen only when necessary; prolonged or too frequent sharpening results in unnecessary
K
NIFE wear. The SHARPEN KNIFE indicator light (Fig. 9 or Fig. 10) will come on after a factory-preset
number of slicing strokes to indicate when sharpening is needed. This number has been set to
represent a typical operation. Your operation may need more frequent sharpening.
Remove the T
OP KNIFE COVER and the plastic RING GUARD COVER. Turn
the L
ATCH KNOB counterclockwise and lift the TOP KNIFE COVER and
plastic R
ING GUARD COVER off the slicer (Figs. 5, 6 & 7). Thoroughly
wash the area around the K
NIFE and both sides of the outer rim of the
K
NIFE. Food debris should not be allowed to transfer from the KNIFE
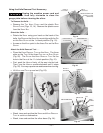
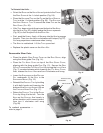
to the SHARPENER. Plug in the machine power cord. When SHARPEN
KNIFE indicator light is on, press the SHARPEN KNIFE button (Fig. 9 or
Fig. 10) with your right hand while pulling the S
HARPENER LEVER fully
forward with your left hand (Fig. 29). The K
NIFE comes on, sharpens
for 8 seconds and shuts off. Release the S
HARPENER LEVER. The stroke
counter will then automatically reset. To sharpen before the S
HARPEN
KNIFE indicator light illuminates: Follow the directions above, but
instead of turning on the motor with the S
HARPEN KNIFE button, press
the O
N button for 8 seconds. Then, release the SHARPENER LEVER and
press the O
FF button. Unplug the SLICER power cord. Wipe the slicer with a clean damp cloth to remove
any grinding particles. Reinstall the plastic R
ING GUARD COVER and the TOP KNIFE COVER.
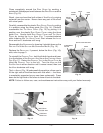
LUBRICATION — Carriage Slide Rod
The slicer lubrication system requires that the reservoirs under the C
ARRIAGE TRANSPORT be refilled with
Lubriplate FMO-200-AW oil (supplied) after approximately 1 year of operation for a manual slicer
(model 3813) and after approximately 6 months of operation on an automatic slicer (model 3913).
Typical operation is estimated to be 3 hours of slicing per day. To check whether the reservoirs are
empty, lift up the right side of the slicer base and allow the L
IFT ASSIST to support the machine (Fig. 18).
Leave the P
RODUCT TRAY in place on the CARRIAGE TRANSPORT.
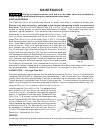
Look through the C
ARRIAGE SLOT (Fig. 7) to observe the oil
level in the C
LEAR PLASTIC RESERVOIRS under the CARRIAGE
TRANSPORT (Fig. 30). A flashlight (not supplied) might be
helpful. To replenish the oil reservoirs: Remove the S
IDE
PANEL (Fig. 7) ( 4 screws), and aim the telescoping tube
on the Lubriplate FMO-200-AW oil bottle at the R
ESERVOIR
FUNNELS above the FRONT and REAR BEARING BLOCKS.
Gently squeeze the sides of the bottle to add drops slowly
to the reservoir(s) (Fig. 30). Move the C
ARRIAGE T RANSPORT
as necessary to access the front and rear RESERVOIR
FUNNELS. The drops will slowly feed into the CLEAR PLASTIC
RESERVOIRS. Replace the SIDE PANEL.
SERVICE
Contact your local Hobart-authorized service office for any repairs or adjustments needed on the slicer.
Fig. 30
Fig. 29
RESERVOIR
FUNNELS
REAR BEARING
BLOCK
FRONT BEARING
BLOCK
CARRIAGE
TRANSPORT
CLEAR PLASTIC
RESERVOIRS
SHARPENER LEVER