


– 9 –
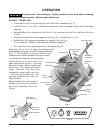
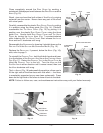
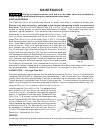
Clean completely around the RING GUARD by working a
moistened, folded paper towel between the RING GUARD and the
K
NIFE (Fig. 15).
Wash, rinse and sanitize both sides of the K
NIFE by wiping
outward from the center. Never clean any part of the slicer
with steel pads.
Carefully reassemble the plastic R
ING GUARD COVER by putting
it in position using the three guide P
INS (Fig. 14). Carefully
reassemble the T
OP KNIFE COVER (Fig. 13) by putting it in
position over the plastic R
ING GUARD COVER using the three
guide P
INS. Secure both RING GUARD COVER and TOP KNIFE
COVER by turning the LATCH KNOB (Fig. 7) counterclockwise
while lowering the T
OP KNIFE COVER; then release the LATCH
KNOB and turn it clockwise until snug.
Reassemble the S
HARPENER by lowering it straight down so the
R
OD AND PIN fit the SLOT on the SHARPENER MOUNT (Fig. 12).
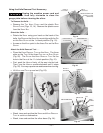
Replace the D
EFLECTOR, if present, below the KNIFE (Fig. 16);
also, refer to page 3.
To reinstall the P
RODUCT TRAY, hold it with both hands and lower
it so the bottom of the S
UPPORT ARM fits on the CARRIAGE HINGE
PINS (Fig. 17). Return the PRODUCT TRAY to the GAUGE PLATE by
tilting the P
RODUCT TRAY to the left. Turn the KNOB on the
S
UPPORT ARM in either direction until it moves inward, then turn
the K
NOB clockwise until snug.
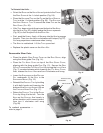
The L
IFT ASSIST (Fig. 18) underneath the machine, allows you to
lift the right side of the slicer base with little effort — the slicer
is completely supported so you can clean underneath. Press
down on the right side of the slicer to lower it back to the table.
NOTE: Failure to follow use, care, and maintenance instructions may void your Hobart warranty.
KNIFE
SHARPENER
MOUNT
DEFLECTOR
DEFLECTOR BRACKET
SUPPORT ARM
CARRIAGE
HINGE PIN
BOTTOM OF
SUPPORT ARM
KNOB
LIFT ASSIST
Fig. 16
Fig. 17
Fig. 18
Fig. 15
PAPER
TOWEL
RING
GUARD
KNIFE
GAUGE
PLATE