


– 3 –
Installation, Operation and Care of
MODEL 3813 & 3913 SLICERS
SAVE THESE INSTRUCTIONS
GENERAL
The model 3813 and 3913 slicers are equipped with a
1
⁄2 HP motor and are available for single-phase
electrical service. The slicer features the Hobart CleanCut
TM
13" diameter contoured stainless steel
knife. The slicer is furnished with a cord and plug as standard equipment. Other features include:
The No Volt Release feature, standard, requires the slicer to be restarted after a power interruption.
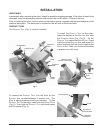
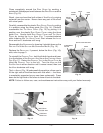
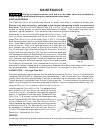
The Gauge Plate Interlock feature, standard, prevents the PRODUCT TRAY (Fig. 1) from being tilted or
removed unless the P
RODUCT TRAY is in the home position (pulled all the way toward you) and the GAUGE
PLATE is closed. Note also that the slicer will not start unless the KNOB on the PRODUCT TRAY SUPPORT
ARM (Fig. 1) is tight.
The Home Start feature, standard, requires the P
RODUCT TRAY (Fig. 1) to be in the home position (pulled
all the way toward you) before the slicer can be started.
The Close-to-Stop feature, standard, turns the slicer off when the GAUGE P LATE is returned to the closed
position by turning the I
NDEX KNOB (Fig. 1) fully clockwise. The slicer also is turned off if the OFF button
is pressed.
The Auto-Shutoff feature, standard, will automatically turn the slicer off if a back-and-forth stroke of
the P
RODUCT TRAY has not been made within 30 seconds.
The Lift Assist feature, standard, allows you to lift and lower the right side of the slicer with little effort
to enable cleaning underneath.
The model 3913 slicer features automatic slicing with a choice of three speeds for the P
RODUCT TRAY.
The Select-a-Stroke
TM
feature allows you to select the exact stroke length to fit the product being sliced;
this can increase the slice rate on items needing a shorter stroke.
ACCESSORIES & OPTIONS
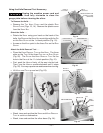
• Fences — Each fence clamps on the P
RODUCT TRAY to limit product movement during slicing.
Two fences are available. The Full Fence is suitable for all products. The End Fence
is for meat or cheese loaves.
•
Food Chute
— Clamps on the PRODUCT TRAY to limit movement of product during slicing (for
tomatoes, onions or similar items).
• Knife — Allows the KNIFE to be removed from the motor hub. After removal, the KNIFE remains
Removal attached to the K
NIFE REMOVAL TOOL while the KNIFE is being cleaned in a sink or
Tool dishwasher. After the removed K
NIFE is cleaned, the KNIFE REMOVAL TOOL is used to
reattach the K
NIFE to the motor hub on the slicer. Refer to pages 10 – 11 for additional
information.
• Deflector — Assists in deflecting sliced product to the platter during slicing. The D
EFLECTOR
(Fig. 16) fits on the DEFLECTOR BRACKET located on the SHARPENER MOUNT.
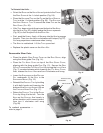
• 4" Leg Set — Raises the height of the slicer for use on some deli carts. To install: Remove the
slicer feet (two adjacent feet at a time) by unscrewing them. Reinstall the slicer feet
on the bottom of the 4" legs. Install a leg with foot in the two adjacent corners of the
slicer base where the slicer feet were removed. Use the same process for the next
two adjacent feet. There are three alternate corner locations that can be used for the
legs / feet in case the table does not permit use of the standard corners. Assure
proper stability by using only one alternate location for any corner.