


– 7 –
SLICING — MODEL 3913
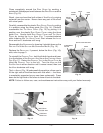
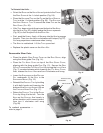
• Close the G
AUGE PLATE by turning the INDEX KNOB fully clockwise (Fig. 7).
• Pull the P
RODUCT TRAY (Fig. 7) all the way toward you until it reaches its stop (this is the home
position).
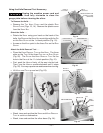
• Raise the M
EAT GRIP to the top of the PRODUCT TRAY, and rest the PARK PIN on the MEAT GRIP SLOT.
• Place the product to be sliced against the G
AUGE PLATE on the PRODUCT TRAY.
• Set the M
EAT GRIP against the product, or use the FENCE or FOOD CHUTE if desired. Refer to
Accessories & Options on page 3.
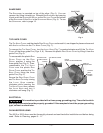
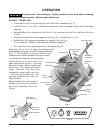
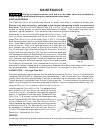
• Turn the slicer on by pressing the K
NIFE ON button (Fig. 10).
Adjust the G
AUGE PLATE to obtain the desired slice thickness by turning the INDEX KNOB
counterclockwise (Fig. 7). The numbers on the INDEX KNOB do not indicate actual measurements
but may be used for reference to duplicate slice thickness.
Use the P
RODUCT TRAY HANDLE (Fig. 7) to push the PRODUCT TRAY back and forth to slice manually.
When finished, pull the PRODUCT TRAY toward you until it stops. Close the GAUGE PLATE by turning
the I
NDEX KNOB fully clockwise — this turns the slicer off (or you can press the OFF button). Raise
the M
EAT GRIP to the top of the MEAT GRIP SLIDE ROD, and rest the PARK PIN in the MEAT GRIP SLOT
(Fig. 8).
To operate the slicer in Automatic mode
• Make sure the P
RODUCT TRAY is in the home position (all the way toward you).
• Load the product against the G
AUGE PLATE on the PRODUCT TRAY and set the MEAT GRIP against the
product. Alternatively, you can secure the F
ENCE or FOOD CHUTE to the PRODUCT TRAY and load the
product accordingly. Refer to Accessories & Options on page 3.
• Turn the slicer on by pressing the K
NIFE ON button (Fig. 10).
• Select one of the three speeds for the P
RODUCT TRAY to move back and forth. Press the RABBIT
symbol to increase speed; press the TURTLE symbol to decrease speed (Fig. 10). The speed
indicator, located to the left of the symbols, shows which speed is selected. You can change the
speed at any time.
• Select a stroke length for the P
RODUCT TRAY to move back and forth by moving the PRODUCT TRAY
forward to the exact place you would like the stroke to begin. Typically the stroke length selected
will be slightly longer (
1
/2" –
3
/4") than the width of the product setting on the PRODUCT TRAY.
• Press the A
UTO ON / PAUSE button to start slicing (Fig. 10); the PRODUCT TRAY moves back and forth
at the speed and at the stroke length you have selected.
• When done slicing, you can stop by pressing either the A
UTO ON / PAUSE button or the OFF button
(Fig. 10). Pressing A
UTO ON/ PAUSE returns the PRODUCT TRAY to the home position (all the way
toward you).
•• If you pressed A
UTO ON / PAUSE, the KNIFE continues to run and the stoke length is retained in
short-term memory for 30 seconds. If you wish to resume slicing within 30 seconds with the
same stroke length, you can press the A
UTO ON / PAUSE button again.
•• If you pressed O
FF or turned the INDEX KNOB fully clockwise, the KNIFE stops, the PRODUCT TRAY
stops where it is and the stroke length reverts back to a full stroke length.
Fig. 10