


– 6 –
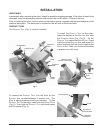
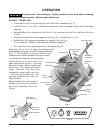
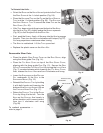
TOP KNIFE COVER
LATCH KNOB
PRODUCT TRAY
MEAT GRIP
INDEX
KNOB
PRODUCT TRAY
HANDLE
MEAT GRIP SLOT
GAUGE
PLATE
MEAT GRIP
SLIDE ROD
PARK PIN
CARRIAGE
SLOT
CONTROLS
SIDE
PANEL
OPERATION
Rotating knife. Use meat grip. Unplug machine power cord before cleaning,
servicing or removing parts. Replace parts before use.
SLICING — MODEL 3813
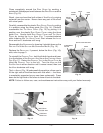
• Close the G
AUGE PLATE by turning the INDEX KNOB fully clockwise (Fig. 7).
• Pull the P
RODUCT TRAY (Fig. 7) all the way toward you until it reaches its stop (this is the home
position).
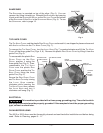
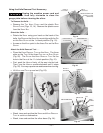
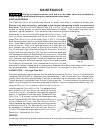
• Raise the M
EAT GRIP to the top of the PRODUCT TRAY, and rest the PARK PIN in the MEAT GRIP SLOT
(Fig. 8).
• Place the product to be sliced against the G
AUGE PLATE on the PRODUCT TRAY.
• Set the M
EAT GRIP against the product, or use the FENCE or FOOD
CHUTE if desired. Refer to Accessories & Options on page 3.
• Turn the slicer on by pressing the K
NIFE ON button (Fig. 9).
Adjust the G
AUGE PLATE to obtain the desired slice
thickness by turning the I
NDEX KNOB counterclockwise
(Fig. 7). The numbers on the I
NDEX KNOB do not
indicate actual measurements but may be used
for reference to duplicate slice thickness.
Use the P
RODUCT TRAY HANDLE (Fig. 7) to
push and pull the P
RODUCT TRAY back
and forth to slice. When finished, pull
the P
RODUCT TRAY toward you until it
stops. Turn the I
NDEX KNOB fully
clockwise to close the G
AUGE PLATE
— this will turn the slicer off. You
can also press the O
FF button to
stop the slicer.
Raise the M
EAT GRIP to the top of
the M
EAT GRIP SLIDE ROD, and rest
the P
ARK PIN in the MEAT GRIP SLOT
(Fig. 8).
PARK PIN IN
MEAT GRIP SLOT
PRODUCT
TRAY
MEAT GRIP
SLIDE ROD
MEAT GRIP ARM
Fig. 9
Fig. 7
Fig. 8