


36
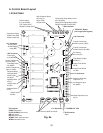
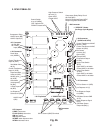
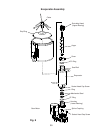
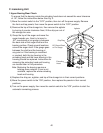
IV. Removal and Replacement of Components
WARNING
• This icemaker should be diagnosed and repaired only by qualied service
personnel to reduce the risk of death, electric shock, serious injury, or re.
• Move the power switch to the "OFF" position and turn off the power supply to the
icemaker before servicing. Lockout/Tagout to prevent the power from being turned
back on inadvertently.
• CHOKING HAZARD: Ensure all components, fasteners, and thumbscrews are
securely in place after the equipment is serviced. Make sure that none have fallen
into the storage bin.
• Make sure all food zones in the icemaker and storage bin are clean after
the icemaker is serviced. For cleaning procedures, see "VI. Cleaning and
Maintenance."
• When replacing evaporator assembly and water circuit components, make sure
there are no water leaks after the repair is complete.
A. Service for Refrigerant Lines
WARNING
• Repairs requiring the refrigeration circuit to be opened must be performed by
properly trained and EPA-certied service personnel.
• Always recover the refrigerant and store it in an approved container. Do not
discharge the refrigerant into the atmosphere.
• Use an electronic leak detector or soap bubbles to check for leaks. Add a trace of
refrigerant to the system (if using an electronic leak detector), and then raise the
pressure using nitrogen gas (140 PSIG). Do not use R-404A as a mixture with
pressurized air for leak testing.
NOTICE
• Do not leave the system open for longer than 15 minutes when replacing or
servicing parts. The Polyol Ester (POE) oils used in R-404A units can absorb
moisture quickly. Therefore it is important to prevent moisture from entering the
system when replacing or servicing parts.
• Always install a new drier every time the sealed refrigeration system is opened.
• Do not replace the drier until after all other repair or replacement has been made.
Install the new drier with the arrow on the drier in the direction of the refrigerant
ow.
• When brazing, protect the drier by using a wet cloth to prevent the drier from
overheating. Do not allow the drier to exceed 250°F (121°C).