


55
18) Move the power switch to the "ON" position, then replace the panels in their correct
positions.
19) Turn on the power supply, then move the control switch to the "ICE" position to start the
automatic icemaking process.
6. Removal and Replacement of Gear Motor
1) Move the control switch to the "DRAIN" position and drain all of the water from the
evaporator.
2) After the water has stopped draining, move the control switch to the "OFF" position,
then turn off the power supply. Remove the front and top panels, then move the power
switch to the "OFF" position.
3) Remove the front cover of the storage bin. Remove spout B, then remove spout A.
See Fig. 1.
4) Remove the apron panel, then remove the left side panel.
5) Remove the evaporator bracket.
6) Remove the bolts securing the lower housing to the gear motor. Lift the evaporator up
slightly.
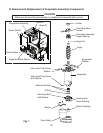
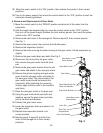
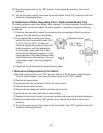
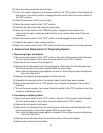
7) Remove the gear motor/drain pan bolts. See Fig. 3.
8) Disconnect the wiring from the gear motor,
then remove the gear motor from the drain
pan.
9) Remove the gear motor bracket from the old
gear motor and attach to the new gear motor.
10) Remove the spline coupling and gear motor
cover from the old gear motor and attach to
the new gear motor. The narrow side of the
gear motor cover should be towards the
evaporator. After tightening the mounting
screws, apply silicone caulk to the heads to
seal them.
11) Place the new gear motor in the drain pan.
12) Using the gear motor/drain pan bolts and
washers, secure the gear motor and drain
pan to the drain pan bracket.
13) Connect the gear motor wires.
14) Lower the evaporator down and secure it to
the gear motor.
15) Replace the evaporator bracket in its
correct position.
16) Replace spout A, spout B, and the front
cover of the storage bin in their correct
positions.
Fig. 3
Gear Motor/Drain Pan
Bolts and Washers
Gear Motor
Gear Motor
Bracket Bolts
Drain Pan
Gear Motor Cover
Drain Pan Bracket
Drain Pan
Bracket Bolts
Gear Motor
Cover Screws
Gear Motor Bracket