


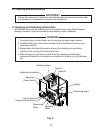
61
10) Open the water supply line shut-off valve.
11) Turn on the power supply, move the power switch to the "ON" position, then replace the
front panel in its correct position to engage the door switch. Move the control switch to
the "ICE" position.
12) Allow the icemaker to ll for two minutes.
13) Move the control switch to the "OFF" position.
14) Remove the front panel and check for water leaks.
15) Move the control switch to the "DRAIN" position. Engage the door switch and
make sure that water is draining and that there are no water leaks around the hose
connection.
16) Move the control switch to the "OFF" position and disengage the door switch.
17) Replace the panels in their correct positions.
18) Move the control switch to the "ICE" position to start the automatic ice making process.
L. Removal and Replacement of Dispensing System
1. Dispensing Auger and Agitator
1) Move the control switch to the "OFF" position, then turn off the power supply. Remove
the front and top panels, then move the power switch to the "OFF" position.
2) Remove the front cover of the storage bin.
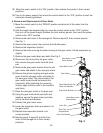
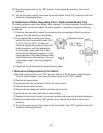
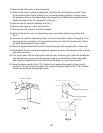
3) Remove the thumbscrews from the vertical plane, then loosen the thumbscrews from
the horizontal plane of the motor bracket. Slide the motor back.
Note: Hold the dispensing auger/agitator to prevent it from dropping when sliding back
the motor. See Fig. 5.
4) Replace the dispensing auger/agitator with the new one.
5) Assemble the removed parts in the reverse order of which they were removed.
6) Move the power switch to the "ON" position, then replace the panels in their correct
positions.
7) Turn on the power supply, then move the control switch to the "ICE" position to start the
automatic icemaking process.
2. Dispensing or Agitating Motor
1) Move the control switch to the "OFF" position, then turn off the power supply. Remove
the front and top panels, then move the power switch to the "OFF" position.
2) Remove the storage bin front panel.
3) Remove the thumbscrews from the vertical plane, then loosen the thumbscrews from
the horizontal plane of the motor bracket. Slide the motor back.
Note: Hold the dispensing auger/agitator to prevent it from dropping when sliding back
the motor. See Fig. 5.
4) Remove the thumbscrews from the horizontal plane of the motor bracket.
5) Remove the motor from the bracket.