


10
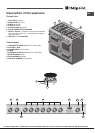
GB
PLEASE PHONE US TO REGISTER YOUR APPLIANCE AND ACTIVATE YOUR PARTS GUARANTEE ON 08448 24 24 24
000
.
A
U
T
O
Step 4 To cancel the audible tone
press the Minute Minder button.
Note 1: When the Minute Minder has been set, the
time remaining can be checked at any time by simply
pressing the Minute Minder button.
Note 2: If necessary the Minute Minder can be cancelled
before the tone sounds by pressing and holding the
Minute Minder button and then at the same time pressing
the “-” button until 0.00 appears in the display window.
Auto cooking programmes
There are two Auto Cooking programmes that can be
selected using your timer:-
(a) To set the timer to switch the oven(s) On and Off
Automatically
(b) To set timer to switch on immediately and OFF
automatically after a set cook period.
a) To set the timer to switch the oven(s)
on and off automatically
This allows you to cook at a specied time for a chosen
period before the oven switches off Automatically.
Step 1 Check that the correct time of day is set, if not follow
instructions for setting the time of day.
Step 2 Place food onto the correct shelf position in the oven
and close the oven door(s).
000
.
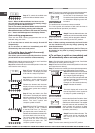
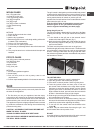
Step 3 Press and hold in the Cook
Period button. The display will read
0.00 with the ‘cookpot’ symbol lit.
Step 4 With the Cook Period button
still held in, set the required Cook
Period using the “+” and “-” buttons.
A
U
T
O
4120
.
Release the buttons and the timer
display will revert to the time of day
with the ‘Auto’ symbol and ‘cookpot’
symbol lit.
A
U
T
O
6120
.
Step 5 Press and hold in the End
Time button. The display will read the
earliest possible end time for the
Cook Period that you have set
above. The ‘Auto’ symbol and
‘cookpot’ symbol will be lit.
Step 6 With the End Time button still
held in, use the “+” and “-” buttons
to set the ‘End Time’ (i.e. The time
you require the oven to switch off ).
Release all the buttons and the timer
will revert back to the time of day.
A
U
T
O
4120
.
The ‘Auto’ symbol will remain lit to
signify that an Auto Cooking
Programme has been set. The
‘cookpot’ symbol will go out.
Step 7 Turn the oven control(s) to the required temperature,
and if necessary select the appropriate oven function.
A
U
T
O
6120
.
At the end of the Automatic Cook
Period the Auto Symbol will ash and
an intermittent bleeping sound will
be heard.
The audible tone will continue unless cancelled.
The ‘Auto’ symbol will continue to ash until the timer is
returned to Manual operation (see below).
6120
.
Step 8 Press the Manual button, the
audible tone will be cancelled and the
oven(s) will be returned to Manual.
Step 9 Turn the oven control(s) to the OFF position.
Note 1: When cooking automatically the Cook Period
can be checked at any time by simply pressing the
Cook Period button.
Note 2: When cooking automatically the End Time can
be checked at any time by simply pressing the End
Time button.
b) To set timer to switch on immediately and
off automatically after a set cook period
Step 1 Check that the correct time of day is set, if not follow
instructions for setting the time of day.
Step 2 Place food onto the correct shelf position in the oven
and close the oven door(s).
Step 3 Turn the oven control(s) to the required temperature,
and if necessary select the appropriate oven function.
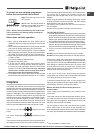
Step 4 Press & hold in the Cook Period
button, the display will read 0.00 and
the ‘cookpot’ symbol will light up.
With the Cook Period button still held
in set the required Cook Period using
the “+” and “-” buttons.
Example: 1hr 30 minutes (as shown).
Step 5 Release all buttons.
A
U
T
O
4120
.
The timer display will revert to the
time of day with the ‘Auto’ symbol lit
& ‘cookpot’ symbol remaining lit.
A
U
T
O
6120
.
NOTE: The Cookpot symbol disappears
At the end of the Cook Period the ‘Auto’
symbol will ash and an intermittent
audible tone will be heard. The audible
tone will continue until cancelled. The
‘Auto’ symbol will continue to ash
until the timer is returned to Manual
operation (see below).
6120
.
Step 6 Press the Manual button. The
audible tone will be cancelled and
the oven(s) will be returned to
Manual.
Step 7 Turn the oven control(s) to the OFF position.