


IGHT-ESH/ESHS-0010
10
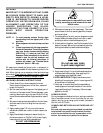
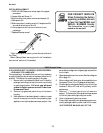
IMPORTANT!
READ BEFORE RAISING FRONT GLASS :
The top cylinders, which allow the raising and lowering
of the glass, have been carefully tested for proper ten-
sion. However, during shipment, the clamshell screws
can work themselves out and/or the lubricant inside may
have settled. This settling may cause excessive or uneven
tension on the glass - to the point of breakage.
Before Rasing the Glass retighten all
screws along clamshell!
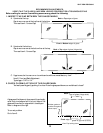
After installing new cylinders, it is advisable to perform
these three easy steps before completely raising the front
glass.
1. Slowly raise and lower each glass section 6 times, to
a height of 6".
2. Increase the height to 12", and raise and lower the
glass 6 more times.
3. Finally, raise the glass to it's full extension. This
should release any settled lubricant in the cylinders,
and prevent any stress on the front glass. (1)(3)
ESH Curved Glass
Replacement
BROKEN GLASS REMOVAL
1. Loosen set screws along clamp.
2. Remove plastic PVC channel (1) between clamshell
and glass.
3. Use new plastic PVC channel. Lift off top of
clamshell, and clean off any particles. Replace
clamshell (Do Not Tighten).
NEW GLASS PREP
1. Centering rubber gasket (2) on handrail, slide all
but outer 3" of gasket into handrail.
2. Apply 3/8" bead of buytl to outer 2" of handrail,
and insert remaining gasket. Trim to length of
handrail.
3. Apply 3/8" bead of buytl to bottom of glass receiver
(3) on handrail.
4. Center handrail on glass. Firmly push onto bottom
edge of glass.
5. Tape securely (4), and allow 12 hours to cure.
NOTE: Do not tape where glass support angles are located on
case (approximately 11-13" from ends).
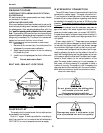
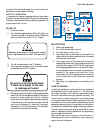
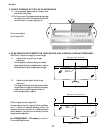
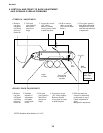
Lift-up Glass
CLAMSHELL ASSEMBLY
(2) RUBBER SEALER
GASKET
(3) HANDRAIL
SILICONE
(5) SUPPORT
ANGLE
(4) TAPE SECURELY
AROUND THE
WHOLE END
(1) PVC U-CHANNEL
INSTALL GLASS
1. Place PVC U-channel (1) on glass.
2. With one person holding each end of the glass, lift
up and place top of glass inside clamshell (glass will
be in fully open position.) Center glass within
clamshell.
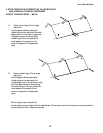
3. With one person holding the glass in the clamshell,
tighten the two set screw on each end and two
equally spaced set screws in the center of the glass
to about 4 ft/lbs.
4. Open and close glass gently, checking to see that the
alignment can be corrected by releasing the set
screws enough to move the glass forward and
backward.
5. Glass should rest squarely on glass support angles
(5). If not, they can be adjusted by loosening the
screw that attaches them to the case.
6. After glass is aligned, tighten set screws.
7. Attach wipes to appropriate edge of glass filling gap
between adjacent pieces of glass. See “Installing
Glass Sweep” section for complete instructions.
8. Leave taped glass closed for 12 hours.
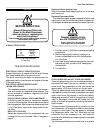
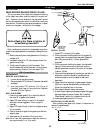
INSTALLING GLASS SWEEP
After installing new glass onto a case, it is important to
replace the glass sweep.
Masking Tape
Front Glass
Glass Sweep