


IGHT-ESH/ESHS-0010
4
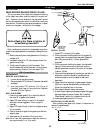
LEVELING
IMPORTANT! IT IS IMPERATIVE THAT CASES
BE LEVELED FROM FRONT TO BACK AND
SIDE TO SIDE PRIOR TO JOINING. A LEVEL
CASE IS NECESSARY TO INSURE PROPER
OPERATION, WATER DRAINAGE, GLASS
ALIGNMENT, AND OPERATION OF THE
HINGES SUPPORTING THE GLASS.
LEVELING THE CASE CORRECTLY WILL
SOLVE MOST HINGE OPERATION
PROBLEMS.
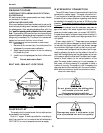
NOTE: A. To avoid removing concrete flooring, begin
lineupleveling from the highest point of the
store floor.
B. When wedges are involved in a lineup, set them
first.
C. If there is a problem with the hinge operation,
first check if case is level. The mini top hardware
may have become loosened during shipping
(ESHS Only). If it does not look level, call
Hussmann Chino immediately for the shim kit
needed to level the mini top hardware, and
continue with the following instructions. (If
problem still persists, see "Clamshell Screw
Adjustment" section – ESH only).
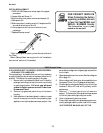
All cases were leveled and joined prior to shipment to
insure the closest possible fit when cases are joined in the
field. When joining, use a carpenters level and shim legs
accordingly. Case must be raised correctly, under legs
where support is best, to prevent damage to case.
LEVELING/JOINING INSTRUCTIONS
1. Check level of floor where cases are to be set.
Determine the highest point of the floor; cases will
be set off this point.
2. Set first case, and adjust legs over the highest part of
the floor so that case is level. Prevent damage – case
must be raised under leg or by use of 2x6 or 2x4 leg
brace. Remove side and back leg braces after case is
set.
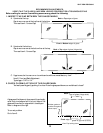
3. Set second case as close as possible to the first case,
and level case to the first using the instructions in
step one.
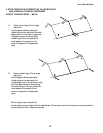
4. Apply masking tape 1/8" in from end of case on
inside and outside rear mullion on both cases to be
joined.
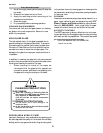
5. Apply liberal bead of case joint sealant (butyl) to
dotted area shown in (Fig.2,#1) of first case. Apply
heavy amount to cover entire shaded area.
DO NOT USE PERMAGUM!
It is the contractor's responsibility to install
case(s) according to local construction and
health codes.
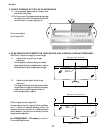
6. Slide second case up to first case snugly. Then level
second case to the first case so glass front, bumper
and top are flush.
7. To compress buytl at joint, use two Jurgenson wood
clamps. Make sure case is level from front to back
and side to side on inside bulkheads at joint.
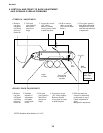
8. Attach sections together via a 2 bolts located in the
base of the case. Secure the overhead structure by
bolting the bracket, located inside behind lights.
Do not use cam locks
to pull cases together!
9. Apply bead of buytl to top of bulkheads and slip on
stainless steel bulkhead cap. Also apply buytl to
seam between overhead light tubes.
10. VERY IMPORTANT! Apply liberal amounts of
black buytl to area under interior lower legs and fill
all voids down to bulkhead.
11.Use finger to smooth buytl as thin as possible at
masking tape on inside and outside of rear mullion
(apply additional buytl if necessary). Remove tape
applied on line #3.
CORNER WEDGES
Corner wedges are attached via front and rear camlocks.
Use a 7mm allen wrench to turn the locks. Do not over-
tighten! Join the top by using a joint bracket (included in
joint kit) with 3/8" bolts.
COMMON END BETWEEN UNLIKE CASES AND HOT
CASES
Bolt end onto case using bolts provided in predrilled
holes behind front panel through bracket provided,
and in the rear behind the rear access panel on the
bottom. Hot case are only bolted in two places.
Installation cont.