


IGHT-ESH/ESHS-0010
8
is heating. The pilot lamp beside the control knob indi-
cates when the well heater is heating.
AUTO-FILL OPERATION
Hussmann hot cases are equipped with an internal auto
fill system that allows automatic filling of the heating pans.
The water level is preset and automatically regulated. The
proper water level is 1 inch.
START-UP
1. Close drain valve.
2. Turn all black toggle switches (Water, Fill, Lights) on.
The well will begin to fill approximately 15 seconds
after the switch is turned on. Fill to 1" depth.
Damage may occur if cold water is fed
into a preheated hot well too quickly!
3. Turn all overhead heat to the "5" position.
4. After the well has begun to fill, turn the well heater
and griddle dial to the "7" position.
Do not turn on the well heater
if there is no water in the unit
or damage will occur!
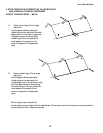
5. Place empty pans in the case to help the case preheat
faster. The unit will take approximately 45 minutes to
preheat. It is also important that the small pan
divider bars are installed properly between each pan.
These dividers provide a seal around each individual
pan and are necessary to maintain the proper
temperature of the food products. Extra dividers
should be stored outside of the case.
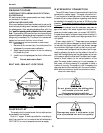
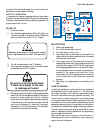
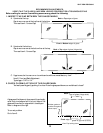
OVERHEAD HEAT LEFT
LO HI
6
5
4
3
2
OFF
OVERHEAD HEAT LEFT
LO HI
6
5
4
3
2
OFF
430-01-0365 9810
1
2
3
4
56
7
8
9
10
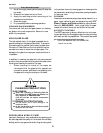
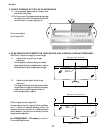
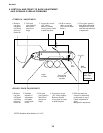
START-UP
(Control Panel on Rear of Case)
POWER
LIGHTS
DECREASE
INCREASE
WATER
FILL
O/H HEAT
LIGHT
TO/H HEA
LIGHT
Check to make sure all lights come
on at start-up. If they do not, contact
your Service Department.
HOT WELL
TEMP.
INITIAL
SETTING
"7"
TURN POWER,
LIGHTS AND
WATERFILL ON
FIRST
OVERHEAD
HEAT
INITIAL
SETTING
"5"
Depending
upon the length
of the case,
there may be
more than one
(1) group of
overhead heat
switches.
However, they
should all be
set at the same
setting.
GRIDDLE
TEMP.
INITIAL
SETTING
"7"
SHUTDOWN
1. Remove all usable food.
2. Turn off all heat and light controls.
3. Turn well heater control to off.
4. Open water drain to drain water from the well. In its
open position, the valve handle will point in the same
direction as the drain pipe.
5. Thoroughly clean all stainless steel surfaces by
washing them down with a mild soapy solution with
a bacteria killing agent. NOTE: When cleaning hot
well area, pay special attention to the auto-fill sensor.
It should be kept clean or the water in the well could
possibly fill to capacity and overflow. Clean
occasionally with a mild cleaning solution. Wiping it
dry will help ensure that the sensor operates
properly.
6. Wipe down non-glass areas on the outside of the
case.
CASE CLEANING
Long life and satisfactory performance of any equipment
are dependent upon the care given to it. To insure long
life, proper sanitation and minimum maintenance costs,
the fixture should be thoroughly cleaned frequently. The
interior bottom may be cleaned with any domestic soap
or detergent based cleaners. Sanitizing solutions will not
harm the interior bottom, however, these solutions should
always be used according to the manufacturer’s directions.
It is essential to establish and regulate cleaning procedures.
This will minimize bacteria causing discoloration which
leads to degraded product appearance and significantly
shortening product shelf life.
Soap and hot water are not enough to kill this bacteria. A
sanitizing solution must be included with each cleaning pro-
cess to eliminate this bacteria.