


IGSSB-SCSS / SCSS-SL-0108
6
Plumbing
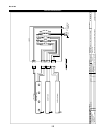
WASTE OUTLET AND P-TRAP
The waste outlet is located off the center of the case on
one side allowing drip piping to be run lengthwise under
the fixture.
A 3/4" P-trap and threaded adapter are supplied with each
fixture. The P-trap must be installed to prevent air leakage
and insect entrance into the fixture.
NOTE: PVC-DWV solvent cement is recommended.
Follow Hussmann’s instructions.
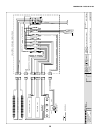
INSTALLING CONDENSATE DRAIN
Poorly or improperly installed condensate drains can se-
riously interfere with the operation of this refrigerator,
and result in costly maintenance and product losses. Please
follow the recommendations listed below when installing
condensate drains to insure a proper installation:
1. Never use pipe for condensate drains smaller than
the nominal diameter of the pipe or P-trap supplied
with the case.
2. When connecting condensate drains, the P-trap
must be used as part of the condensate drain to
prevent air leakage or insect entrance. Store plumb-
ing system floor drains should be at least 14" off the
center of the case to allow use of the P-trap pipe
section. Never use two water seals in series in any
one line. Double P-traps in series will cause a lock
and prevent draining.
3. Always provide as much down hill slope (“fall”) as
possible; 1/8" per foot is the preferred minimum.
PVC pipe, when used, must be supported to main-
tain the 1/8" pitch and to prevent warping.
4. Avoid long runs of condensate drains. Long runs
make it impossible to provide the “fall” necessary for
good drainage.
5. Provide a suitable air break between the flood rim of
the floor drain and outlet of condensate drain. 1" is
ideal.
6. Prevent condensate drains from freezing:
a. Do not install condensate drains in contact with
non-insulated suction lines. Suction lines should be
insulated with a nonabsorbent insulation material
such as Armstrong’s Armaflex.
b. Where condensate drains are located in dead air
spaces (between refrigerators or between a
refrigerator and a wall), provide means to prevent
freezing. The water seal should be insulated to
prevent condensation.
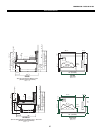
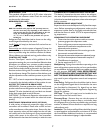
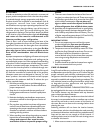
Waste Outlet
Nipple
Inside Case
(All Models)
Coupling
90°
Air Gap
Remote
Refrigeration
Only!
CORNER WEDGES
Corner wedges are attached via front and rear camlocks.
Use a 7mm Allen wrench to turn the locks. Do not over-
tighten! Join the top by using a joint bracket (included in
joint kit) with 3/8" bolts.
Installation (cont’d.)
JOINT TRIM
After cases have been leveled and joined, and refrigera-
tion, electrical, and wasted piping work completed, install
the splashguards. Fasten along the top edge, or center, with
#10 X 3/3" sheet metal screws.
DO NOT SEAL JOINT T RIM T O FLOOR!