


31203000213
3. Unfasten safety chain and remove empty CO
2
cylinder.
4. Position full CO
2
cylinder and secure with safety chain.
WARNING: To avoid personal injury and/or property damage, always secure CO
2
cylinder
in an upright position with safety chain to prevent it from falling over. Should the shutoff
valve become accidentally broken off, CO
2
cylinder can cause serious personal injury.
5. Make sure gasket is in place inside the CO
2
regulator coupling nut, then install regulator on CO
2
cylinder.
6. Open (counterclockwise) CO
2
cylinder valve slightly to allow the lines to slowly fill with gas, then open the
valve fully to back-seat the valve. (Back-seating the valve prevents leakage around the valve shaft).
7. Check CO
2
connections for leaks. Tighten loose connections.
CLEANING AND SANITIZING
DAILY CLEANING OF UNIT
Daily, or more often if necessary, wash all external surfaces of the Unit with a mild soap solution. Rinse with
clean water, then wipe the Unit dry with a clean soft cloth. DO NOT USE ABRASIVE CLEANERS. Remove and
wash the drip tray in a mild soap solution, rinse with clean water, then install drip tray on the Unit.
SANITIZING SYRUP SYSTEMS
NOTE: The Unit should be sanitized every 90 days by a qualified Service Person following the Sanitizer
Manufacturer’s recommendation. Use Chlor-Tergent (Oakite Products, Inc.) or equivalent sanitizer.
The Unit should be sanitized every 90 days following the parent company requirements and the sanitizer
manufacturer’s recommendations. One or both of the syrup systems may be sanitized at one time for routine 90
days sanitizing requirements. The following sanitizing instructions use No.1 syrup system as an example. No. 2
syrup systems sanitizing instructions are identical to No. 1 syrup system with the exception of using applicable
system switches. Proceed as follows:
1. Press SIDE 2 ‘‘OFF’’ switch to stop beater motor and refrigeration in No. 2 freeze cylinder, which is not to
be defrosted. ‘‘OFF 2’’ fault message will appear on message display.
2. Press ‘‘MANUAL DEFROST’’ switch to start defrost cycle on No. 1 freeze cylinder. ‘‘DEFROST 1’’ mes-
sage will appear on message display as long as defrost cycle is in progress.
3. Immediately press SIDE 2 ‘‘BLEND ON/OFF’’ switch to restart the beater in No. 2 freeze cylinder. Refrig-
eration in No. 2 cylinder will not be operating.
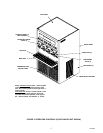
4. Remove right-hand side panel as instructed for access to No. 2 product blender tank product shutoff valve.
5. Close No. 2 product blender tank product shutoff valve to prevent product bleeding back into No. 1 product
blender tank during sanitizing procedure.
6. Press SIDE 1 “BLEND ON/OFF” switch to prevent more product from entering the product blender tank.
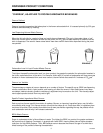
7. Place waste container under No. 1 cylinder dispensing valve nozzle. Open dispensing valve and dispense
all product from the freeze cylinder and the product blender tank. As product level lowers in the freeze cyl-
inder, partially close the valve to avoid spurting.
8. Remove Unit front lower access panel as instructed for access to No. 1 product blender tank product sam-
ple valve.
9. Place waste container under No. 1 product blender tank product sample valve. Slowly open valve and
purge remaining product out of the tank, then close the valve.