


17
CAUTION:
OVEN LIGHT
To assure the proper replacement bulb is
used, order bulb from Maytag Customer
Service. Call 1-800-688-8408, ask for part
number 74004458 - halogen bulb.
• Disconnect power to range before re-
placing light bulb.
• Allow oven to cool before replacing light
bulb.
• Make sure bulb cover and bulb are cool
before touching.
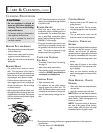
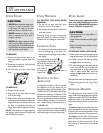
TO REPLACE OVEN LIGHT BULB:
1. When oven is cool, use fingertips to grasp
edge of bulb cover. Pull out and remove.
2. Carefully remove old bulb by pulling
straight out of ceramic base.
3. To avoid damaging or decreasing the life
of the new bulb, do not touch the bulb
with bare hands or fingers. Hold with a
cloth or paper towel. Push new bulb
prongs straight into small holes of ce-
ramic base.
4. Replace bulb cover by snapping into place.
5. Reconnect power to the range. Reset
clock.
CAUTION:
OVEN DOOR
MAINTENANCE
• NEVER place excessive weight on or
stand on an open oven door. This
could cause the range to tip over,
break the door, or injure the user.
• NEVER attempt to open or close
door or operate oven until door is
properly replaced.
• NEVER place fingers between hinge
and front oven frame. Hinge arms are
spring mounted. If accidentally hit, the
hinge will slam shut against oven frame
and could injure your fingers.
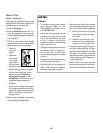
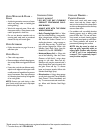
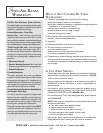
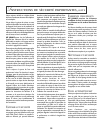
LEVELING LEGS
• Be sure the anti-tip bracket secures one of
the rear leveling legs to the floor. This
bracket prevents the range from acciden-
tally tipping.
The range should be leveled
when installed. If the range is
not level, turn the plastic lev-
eling legs, located at
each corner of
the range, until
range is level.
ANTI-TIP BRACKET
LEVELING LEG
ANTI-TIP BRACKET
LEVELING LEG
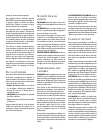
TO REMOVE:
1. When cool, open the oven door to the
broil stop position (opened about four
inches).
2. Grasp door at each side. Do not use the
door handle to lift door.
3. Lift up evenly until door clears hinge
arms.
TO REPLACE:
1. Grasp door at each side.
2. Align slots in the door with the hinge
arms on the range.
3. Slide the door down onto the hinge arms
until the door is completely seated on the
hinges. Push down on the top corners of
the door to completely seat door on
hinges. Door should not appear crooked.
NOTE: The oven door on a new range may
feel “spongy” when it is closed. This is normal
and will decrease with use.
OVEN WINDOW
TO PROTECT THE OVEN DOOR
WINDOW:
1. Do not hit the glass with pots, pans,
furniture, toys, or other objects.
2 Do not close the oven door until the oven
racks are in place.
Scratching, hitting, jarring or stressing the
glass may weaken its structure causing an
increased risk of breakage at a later date.
STORAGE DRAWER
The storage drawer at the bottom of the
range is safe and convenient for storing metal
and glass cookware. DO NOT store plastic,
paperware, food or flammable material in
this drawer. Remove drawer to clean under
range.
To remove: Empty drawer then pull out to
the first stop position. Lift up front of drawer
and pull to the second stop position. Grasp
sides and lift up and out to remove drawer.
To replace: Fit the ends of the drawer
glides onto the rails. Lift up drawer front and
gently push in to first stop position. Lift up
and continue to slide drawer to the closed
position.
REMOVAL OF GAS
APPLIANCE
Gas appliance connectors used to connect
this appliance to the gas supply are not
designed for continuous movement. Once
installed, DO NOT repeatedly move this gas
appliance for cleaning or to relocate. If this
appliance has to be moved and/or removed
for servicing, follow the procedure described
in the installation instructions. For informa-
tion, contact Maytag Customer Service at
1-800-688-1100.
To prevent range from accidentally tipping,
range must be secured to the floor by sliding
rear leveling leg into the anti-tip bracket.