


6
OVEN COOKING
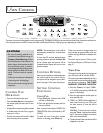
CONTROL PAD
OPERATION
• Press the desired function pad.
• Press the Auto Set pad or the appropri-
ate number pad(s) to enter time or tem-
perature.
• A beep will sound when any pad is pressed.
• A double beep will sound if a program-
ming error occurs.
• Further instructions will scroll in display
after function pads are pressed.
NOTE: The temperature or time will be
automatically entered four seconds after
selection.
If more than 30 seconds elapse between
pressing a function pad and the Auto Set
pad or number pads, the function will be
canceled and the display will return to the
previous display.
CONTROL OPTIONS
Several control options are indicated under
the number pads on the control. Factory-
set options can be changed to your prefer-
ences. See page 12 for more information.
SETTING CONTROL
FUNCTIONS
CLOCK PAD
1. Press Clock pad. Indicator word TIME
will flash in the display.
2. Press the appropriate number pads for
the current time.
After a power interruption, POWER IN-
TERRUPTION will scroll followed by SET
CLOCK.
To recall the time of day when another
function is showing, press Clock pad.
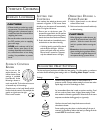
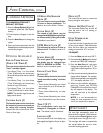
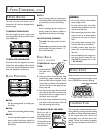
The electronic control is designed for ease in programming. The display window on the control shows time of day, timer and oven functions.
Control panel shown includes Convect and other model specific features. (Styling may vary depending on model.)
Clock time cannot be changed when the
oven has been programmed for clock con-
trolled cooking, self-clean or delayed self-
clean.
The clock may be set to a 24-hour clock.
See Control Options (12/24 Hour Clock),
page 12.
TIMER PADS
The timer(s) may be set for any time period
up to 99 hours and 59 minutes (99:59).
The timer(s) operates independently of any
other function and can be set while another
oven function is operating. THE TIMER
DOES NOT CONTROL THE OVEN.
1. Press the Timer 1 or 2 pad. TIMER 1
or 2 will flash respectively. 0HR:00 will
appear in the display.
2. Press the appropriate number pads to
enter desired time.
3. TIMER 1 or TIMER 2 will be displayed. If
both timers are active, the Timer with
the least amount of time left will be
displayed.
EXAMPLE: To set a timer for 5 minutes,
press the Timer 1 pad and the number
pad 5. The control will begin countdown
after a four second delay.
4. The last minute of the countdown will be
displayed in seconds.
• Be sure all packing material is re-
moved from oven before turning on.
• Prepared Food Warning: Follow
food manufacturer’s instructions. If a
plastic frozen food container and/or
its cover distorts, warps, or is other-
wise damaged during cooking, imme-
diately discard the food and its con-
tainer. The food could be contami-
nated.
• Follow the manufacturer’s directions
when using oven cooking bags.
• Do not use oven for storing food or
cookware.
CAUTION: