


10 11
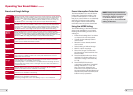
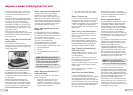
The following instructions are to be
used when making Bread or Dough
recipes from the recipe section of
this book.
All recipes use local ingredients and
Australian Standard Metric Measuring
tools (cup, spoons and weighing
scales) for accuracy in producing a
450g, 680g or 900g loaf of bread. The
actual weight of the baked loaf will
vary depending on the weight of raw
ingredients used.
Remove and safely discard any
packaging materials and promotional
labels before using the Bread Maker
for the first time.
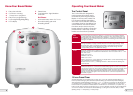
Step 1: Open the Lid and Remove
the Bread Pan
Open the lid and remove the
bread pan from the Bread Maker by
holding, twisting the bread pan and
lifting straight up.
Always remove the bread pan from
the Bread Maker before adding
ingredients to ensure ingredients are
not spilt into the baking chamber and
the element.
Before using for the first time, we
recommend that the inside of the
bread pan and the kneading blades
are washed with warm soapy water,
rinsed and dried thoroughly. Do not
immerse the bread pan in water.
Step 2: Insert the Kneading Blade
It is important that the kneading
blade is properly inserted on the
shaft in the base of the bread pan by
aligning the flat edge on the inside of
the kneading blade with the flat side
of the shaft. If the blade is not inserted
correctly the ingredients may not be
mixed and kneaded properly.
Step 3: Add Ingredients Into the
Bread Pan
It is IMPORTANT that the ingredients
are added in the correct order listed
in the recipe and that the ingredients
are measured and weighed
accurately or the dough may not mix
correctly or rise sufficiently.
All ingredients should be at room
temperature 20-25°C. Ingredients
should be added in the following order:
1. Liquid ingredients
2. Fat/Oil
3. Dry ingredients: salt, sugar, flour
4. Yeast
NOTE: Mound the flour into the
pan, make a small hollow in the
centre and place the yeast there.
If the yeast contacts the water
before the kneading, the bread
may not rise well.
Step 4: Return the Bread Pan to
the Bread Maker
Insert the bread pan into the Bread
Maker as follows:
1. Place the bread pan into the
baking chamber and locate
the drive mechanism of the pan
directly onto the drive mechanism
in the baking chamber.
Beginner’s Guide To Baking Your First Loaf
2. Push the bread pan down firmly
and turn until it clicks in position.
Step 5: Close the Lid
It is not recommended to open the lid
during operation except to check the
consistency of the dough and add
additional ingredients in the kneading
cycle, or to glaze and add seeds to
the top of the loaf in the baking cycle
refer below.
Step 6: Plug in the Bread Maker
Insert the power plug into a 230V or
240V power outlet. Switch on at the
power outlet.
The LCD Screen will display 1 (BASIC)
then automatically change to show
the total time 3:25 for the setting (BASIC
bread, MEDIUM crust). A red light will
illuminate beside the MENU panel.
Step 7: Select the Bread Setting
and Crust Colour
Press the MENU button until the LCD
Screen indicates the number of the
required setting.
The symbol ‘-‘ will also show above
the setting in the LCD Screen when a
bread Setting is selected.
Press the CRUST button once to select
DARK crust or three times to select
LIGHT crust.
The crust selection is available on
bread settings 1-4.
Step 8: Start the Bread Maker
Press the START/STOP button to
commence operation. The total setting
time will appear on the LCD screen.
The setting time will count down in one
minute increments. The colon between
the hour and the minutes displayed will
flash throughout the kneading, rising
and baking cycles.
The kneading cycles commence.
During the kneading cycles beeps will
sound indicating the correct time to
add other ingredients.
Add-In Ingredient Beeper
The Bread Maker features an ‘Add-In
Ingredient Beeper’ which operates
in the BASIC, RAPID, SWEET, FRENCH,
WHOLE WHEAT and DOUGH settings.
The Bread Maker will sound 10 beeps
at approximately 8 minutes before
the end of the second kneading
cycle, indicating the time to add any
additional fruit, nuts, herbs, chocolate,
etc. required or as specified in the
recipes.
The addition of ingredients at this time
assists with keeping fruits, etc. whole,
rather than being mashed through
the dough making it heavy.
Open the lid, gradually add the
additional ingredients to the dough as
it is kneading. Take care not to drop
the ingredients over the side of the
bread pan into the baking chamber,
as these may burn and smoke during
the baking cycle. Close the lid.
NOTE: Do not press the stop
button to add ingredients as this
will cancel the selected program.
The rising cycles begin when the
kneading cycles end and the dough
will start to rise. During the rising cycles,
the dough will be degassed twice by
the blade moving at the end of the first
and second rising cycles. The dough
rises fully in the third rising cycle.
The baking cycle commences when
rising cycles end. The dough may rise
a little more at this time due to the
increasing heat expanding the gasses
entrapped in the dough.