


DEFROSTING TIPS TWO-STAGE COOKING
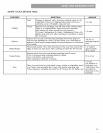
*When using Auto Defrost, the weight to be
entered is the net weight in pounds and tenths
of pounds (the weight of the food minus the
container).
*Before starting, make sure to remove any and
all metal twist-ties that often come with frozen
food bags, and replace them with strings or
elastic bands.
*Open containers, such as cartons, before
placing in the oven.
*Always slit or pierce plastic pouches or
packaging.
*If food is foil wrapped, remove foil and place it
in a suitable container.
*Slit the skin of skinned food, such as sausage.
*Bend plastic pouches of food to ensure even
defrosting.
*Always underestimate defrosting time. If
defrosted food is still icy in the center, return it
to the microwave oven for more defrosting.
*The length of defrosting time varies according
to how soNdly the food is frozen.
*The shape of the package affects how quickly
food will defrost. Shallow packages will defrost
more quickly than a deep block.
*As food begins to defrost, separate the pieces.
Separated pieces defrost more easily.
*Use small pieces of aluminum foil to shield parts
of food such as chicken wings, leg tips, fish tails,
or areas that start to get warm. Make sure the
foil does not touch the sides, top, or bottom of
the oven. The foil can damage the oven lining.
*For better results, let food stand after defrosting.
(For more information on standing time, see the
"'Microwave Cooking Tips" section).
*Turn over food during defrosting or standing time.
Break apart and remove food as required.
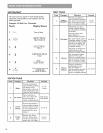
For best results, some recipes call for different
power levels during a cook cycle. You can
program your oven for two power level stages
during the cooking cycle.
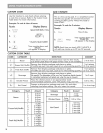
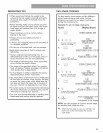
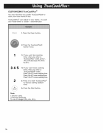
Example: To sel a 2-slage cook cycle.
Touch: Display Shows:
1. Cook
T_,v
I I<::o
I'I\ITI'F___I rrlr"ll/ll\ll-- TII_'II ''
" Co ooCo\ LuurHo O_J OH oC
ZLNN
5: 0¸¸ -'"-"-'
2. 3 : T,-.,ru ,-Tc,OT,-,O
I LILILI I :1 I rll\ i LII\
Cirll lOCi i rl irl
To set a 3 minute cook _UL,ILI\ LCI/CL
time for first stage.
3. Cook : .uu
ClFII IC__J ]rlrl
{_'}OV:II}}r I LIL, ILI\ ILILI
r'l\lTr'Fg or-ii ICFj I El ir'l rl Trl ll'l
CI IICI\ I LIL, ILI\ LCI/CL LI ILl ILl
ZLNN
4. £ _L U U
"_ cir, I ICO r,r, Tr, I IrU rTr',oT
I U_I:_I\ CIU IUULI I _llni\l
To set an 80% cook
power for the first stage.
5. Cook
Tiwe
I'l\lTl'F___l r f-'lr'll/ll\lf" TII_'II ''
+ CI IICI\ L.LJLJI-III I1.,,.'1III IC
.
7.
7 1:
To set a 7 minute cool<
time for second stage.
"t,l-iN
I+ULI
TFII IrLI F"TCIOT rlCI
I LILILI I _11 rll\ i LII\
Firll lOCi i rl irl
LILIL IS LCI/CL
-t,riN
Coo/_] Lug
CI-II I_CI "iriN
{_')0_+kT_ r LIWCI\ lULl
rl'qll'-O Cinl ICO I rl irl rl in In
CI IICI\ i u_l_i\ LCIICL U IU IU
.
-ir_r_
5 "-"-'or_ _co rr_ _ e__c_ r_Tn In
I LII_,ILI\ _ILI LCI/CL LI ILl ILl
To set a 50% cook power
for the second stage.
.
START
Time counting down and
Cinl ICCl On
I UL, ILI\ UU
will appear in the display
NOTE: You can program a 0 power second stage
for standing time inside the oven.
|0. When the first stage is over_ you will hear two
short tones as the oven begins the second
cool< stage.
23