


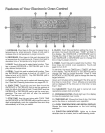

Clocl<
The clock must be set for the automatic oven timing
functions to work properly. The time of day cannot be
changed during a TIME BAKE or CLEAN cycle
To Set the Clock:
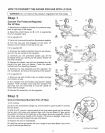
Step 1. Touch the CLOCK pad The
word "TIME" will flash in the display
Step 2. Press & hold or tap INCREASE
or DECREASE pad to set the time of
day, (Tap to change time 1 minute a tap.
Press & hold to change time 10 minutes
at a time )
Example: Try setting the time for 3:00 Use a combi-
nation of presses and taps to get familiar with the con-
trol Since this is a 12-hour clock, there is no need to
worry about AM or PM
If you accidentally go past 3:00, sh-nply
press & hold or tap the DECREASE pad
untl the time shows in the display
bq Case of Power Outage:
After a power outage, when power is restored the dis-
pIay wilt flash and time shown will no longer be cor-
rect
Display flashes until clock is reset., Al! other functions
that were in operation when the power went out will
have to be programmed again
Timer
The timer does not control oven operations, The max-
imum setting on the timer is 9 hours and 55 minutes
To Set The 'Timer:
Step 1. Touch the TIMER pad The word
"TIMER" will flash in tile display.
The timer, as you are setting it, will display seconds
until 60 seconds is reached, Then it will display min-
utes and seconds until 60 minutes is reached, After 60
minutes, it will display hours ("HR" now appears in
display) and minutes until the maximum time of 9
hours and 55 minutes is reached
To Reset Timer:
Touch TIMER pad and then press & hold or tap
INCREASE or DECREASE pad until desired time is
reached
To Cancel Timer:
Press & hold TIMER pad until the word "TIMER" quits
flashing on the display (about 4 seconds)
"['ones
The end-of-cycle tone will sound at the end of time
oven functions The end-of-cycfe tone is a steady sig-
nal that repeats every 6 seconds until you touch any
operation If you would like to change the tone to a set
of 3 short beeps, press & hold CLEAR/OFF for 10
seconds
To return the end-of-cycle tone to a steady repeating
signal, press & hold CLEAR/OFF for 10 seconds
Display
Programmed information can be displayed at any time
by touching the pad of the operation you want to see
For example, you can display the current time of clay
while the timer is counting down by touching the
CLOCK pad
"door" appears on display, The oven door is in the
locked position. BAKE, BROIL and COOK TIME can-
not be set if the door is in the locked position.,
"F-" and a number flash on display. This is the
function error code. If function error code appears
during the self-cleaning function, check oven door
latch--the latch handle may have been moved, even
if only slightly, from the latched position Make sure
handle is to the right as far as it will go, Touch
CLEAR/OFF pad if function error code does not
dear, disconnect power to the range and call for ser-
vice
Step 2. Press & hold or tap INCREASE or DE-
CREASE pad to set the amount of time on timer
(Pressing & holding the pad changes time in Iarge
amounts Short taps change time in smater amounts)
The timer will start automatically within a few seconds
of releasing the INCREASE or DECREASE pad
19