


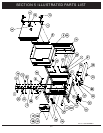
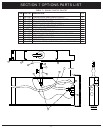
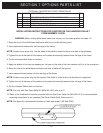
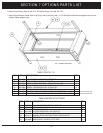

FIG. 7.9 CROSS SECTION
ITEM
1
2
3
QTY.
4
13
13
PART NO.
98-0969
10-2317
10-2401
DESCRIPTION
3/8-16 THREADED ROD
3/8-16 HEX NUT
3/8 WASHER
TABLE FOR FIG. 7.9
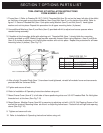
TRIM JOINTING KIT INSTALLATION INSTRUCTIONS
FORM NUMBER: S-2417
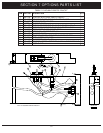
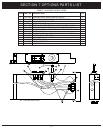
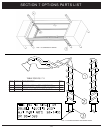
1. Thread Item 1 (Refer to Drawing 98-1517) 3/8-16 Threaded Bolt thru Riv-nut on the lower left side of the skillet
so that there is enough room to secure Washer (Item 3)and Nut (Item 2) on the inside of the skillet. Refer to
figure 1.2. Secure Threaded Bolt (Item 1)into place using Washer (Item 3) and Nut (Item 2) hand tighten
washer and nut into place. Repeat this procedure for all upper mounting holes. (4 places)
2. Use additional Washers (Item 2) and Nuts (Item 3) provided with kit to adjust and use as spacers where
needed during assembly.
3. If feasible at this time align skillet with adjoining unit. Threaded Bolt (Item 1) should slide thru mounting
location provided on allGF Market Forge modular assembly frames. Attach using Washers (Item 3) and Nuts
(Item 2) to inside of adjoining unit. Hand tighten washer and nut into place. Repeat this procedure for all lower
mounting holes. (4 places) (See Fig 7.9)
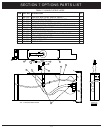
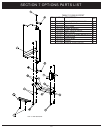
4. After all eight Threaded Rods (Item 1) have been hand tightened, reinstall all modular frame enchancements
provided with the Universe Skillet.
5. Tighten and secure all nuts.
6. Refer to Installation & Operating Instructions before using unit.
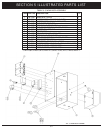
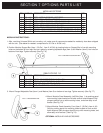
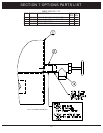
7. Mount Frame Cover (Item #`1) to left side of frame positioning slots over 3/8-16 Threaded Rod. Do Not tighten
threaded rod at this time. (See Fig 7.10)
8. Mount Spacer, Modular Frame (Item #2) by securing to adjoining unit with #10-32 Self Tapping Screw or Nut
and bolt as required. Mounting holes are found on adjoining frame base. Fits both left and right side opening
doors. (See Fig 7.10)
9. Tighten and secure all nuts.
10. Refer to Installation & Operating Instructions before using unit.
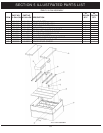
SECTION 7 OPTIONS PARTS LIST
7-9