


7
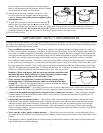
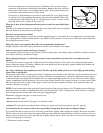
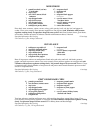
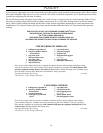
4. Occasionally remove the air vent/cover lock in the pressure cooker cover
handle for cleaning. To remove the air vent/cover lock, place your nger over
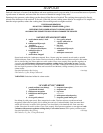
the hole in the cover handle (Fig. N) and remove the white rubber gasket from
the air vent/cover lock on the underside of the cover (Fig. O). Push the air
vent/cover lock through the top of the cover and wash it and the gasket in hot,
sudsy water. The metal shaft of the air vent/cover lock may be cleaned with a
nylon mesh pad. Clean the hole in the cover handle with a small brush. After
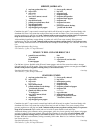
cleaning, reinsert the metal shaft of the air vent/cover lock from the top side
of the cover down through the cover handle hole (Fig. P). Place a nger over the handle
hole (to keep the cover lock from falling out) and turn the cover over. Wet the rubber
gasket and push onto the end of the metal shaft until it snaps into the groove on the
shaft.
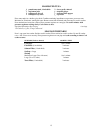
5. The overpressure plug can also be removed for cleaning by pushing it out of its opening
from the top of the cover. After cleaning, reinsert it by pushing the domed side of the
plug, marked “TOP”, into the opening from the underside of the cover, until the bottom
edge is fully and evenly seated against the underside of the cover (Fig. Q). When the
overpressure plug is properly installed, the word “TOP” will be visible on the overpres-
sure plug when viewing the outside of the cover.
6. The pressure relief valve should not be disassembled for cleaning or repair. Clean the
exposed surface of the valve when cleaning the underside of the cover.
7. To bring out its luster, the outside surface of your stainless steel pressure cooker can be
cleaned occasionally with a silver polish or any other ne, non-abrasive polish.
Take care not to overheat your stainless steel pressure cooker. Very high heat can some-
times cause vari-colored stains, called heat tints, in stainless steel. Heat tints can usually
be removed by using a non-abrasive powder cleanser.
Care and maInTenanCe
1. When not in use, store your pressure cooker in a dry place with the cover inverted on the body. If the cover is locked
on, unpleasant odors may form inside the unit and the sealing ring could be damaged.
2. As is the case of all cookware, avoid chopping or cutting food inside the cooker with a knife or other sharp utensil.
3. If the body or cover handles become loose, tighten them with a screwdriver. CAUTION: Overtightening can result in
stripping of screws or cracking of handles and legs.
4. Periodically check the vent pipe nut for looseness. Retighten, if necessary, using a
7
⁄
16
″ wrench.
5. Periodically check the pressure relief valve nut for looseness. Retighten, if necessary, using an
11
⁄
16
″ wrench.
6. Do not strike the rim of the pressure cooker with any cooking utensil because this could cause nicks in the rim which
may allow steam to escape and prevent the pressure cooker from sealing.
7. The sealing ring, overpressure plug, and rubber gasket of the air vent/cover lock may shrink, become hard, deformed,
cracked, worn, or pitted with normal use. Exposure to high heat, such as a warm burner or oven top, will cause these
parts to deteriorate rapidly. When this happens, replace the sealing ring, overpressure plug, and small rubber gasket of
the air vent/cover lock. Replace the sealing ring and overpressure plug at least every two years.
Leakage between the cover and body is usually caused by shrinkage of the sealing ring after prolonged use. Replace
the sealing ring. Whenever you replace the sealing ring, replace the overpressure plug also.
8. Each time you clean or use your pressure cooker, check to be sure the bottom has not been damaged. Nicks and
scratches may leave sharp edges that can damage ceramic stovetops or other smooth surfaces. Lift pressure cooker to
remove it from burner. Sliding cookware could leave scratches on stovetops.
9. The formation of a small amount of moisture under the pressure regulator is normal when cooking rst begins. It is the
result of the temperature of the regulator being lower than the rest of the unit.
Fig. N
Cover
Handle
Hole
Metal
Shaft
Cover
Handle
Hole
Fig. P
Fig. O
Rubber Gasket
Indented Portion
Overpressure Plug
Fig. Q