


3
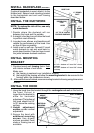
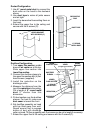
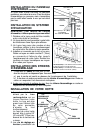
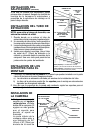
FRAMING BEHIND DRYWALL
ADDITIONAL
MOUNTING
SCREWS
RECTANGULAR
CUTOUT
HEIGHT
ADJUSTMENT
SCREWS
36 3/4"= bottom of hood 24" above
cooktop
42 3/4"= bottom of hood 30" above
cooktop
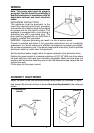
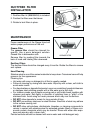
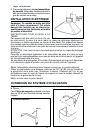
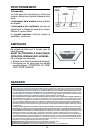
ROOF CAP
6” ROUND
DUCT
DECORATIVE
FLUE
HOOD
WALL
CAP
6”
ROUND
ELBOW
24” TO 30” ABOVE
COOKING SURFACE
36 3/4 to 42 3/4
above cooktop
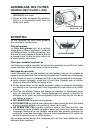
INSTALL BACKSPLASH (OPTIONAL)
If optional backsplash is used, attach it to the
finished wall. Secure hood mounting bracket
to the backsplash and omit wall framing
described below.
INSTALL MOUNTING
BRACKET
1. Construct wood wall framing that is flush
with interior surface of wall studs.
Make sure:
a) the framing is centered over installation location.
b) the height of the framing will allow the mounting bracket to be secured to the
framing within the dimensions shown.
2. After wall surface is finished, secure mounting bracket to framing using dimensions
shown.
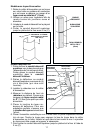
INSTALL THE HOOD
1. Hang the hood from the bracket through the rectangular cut-out on the back of
the hood. Cut-out is
larger than the bracket to
allow for horizontal
adjustment. The bottom of
the hood should be 24"
to 30" above the cooking
surface.
2. Height adjustment
screws provide vertical
adjustment.
3. Secure the hood with
additional mounting
screws. Use drywall
anchors, provided, if wall
studs or framing are not
available.
WALL FRAMING
MOUNTING
BRACKET
INSTALL THE DUCTWORK
NOTE: To reduce the risk of fire, use only
metal ductwork.
1. Decide where the ductwork will run
between the hood and the outside.
2. A straight, short duct run will allow the hood
to perform most efficiently.
3. Long duct runs, elbows, and transitions will
reduce the performance of the hood. Use
as few of them as possible.
4. Install a roof or wall cap. Connect 6" round
metal ductwork to cap and work back to-
wards hood location. Use duct tape to seal
the joints between ductwork sections.