


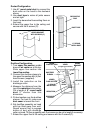
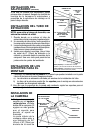


5
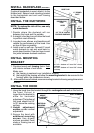
UPPER
FLUE SECTION
DUCTFREE
PLENUM
AIR
VENTS
(in upper flue section)
UPPER
BRACKET
LOWER
FLUE SECTION
DUCT
SEAM
DISCHARGE
COLLAR
MEASURE
5" ROUND
METAL DUCT
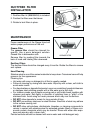
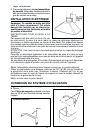
Ducted Configuration
1. Use 6" round metal duct to connect the
duct collar on the hood to the ductwork
above.
2. Use duct tape to make all joints secure
and air tight.
3. Insert the decorative flues setting them on
the hood.
4. Extend the upper flue to the ceiling and
secure with the 2 screws (C).
6" ROUND
METAL DUCT
DUCT TAPE
DECORATIVE
FLUE
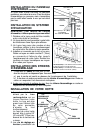
Ductfree Configuration
1. Turn upper flue section upside
down so air vents are at the top.
Slide upper flue section into
lower flue section.
2. Connect the ductfree plenum to
the upper flue section with (4) flat-
head screws (supplied).
3. Install the reduction on the
discharge collar.
4. Measure the distance from the
top of the reduction to the ceiling.
Cut a length of 5" round metal
duct 5" shorter than this
dimension.
5. Fit duct section over the ductfree
plenum. For best fit, make sure
duct seam is toward the front.
6. Set duct/flue assembly on hood
with top tilted away from wall.
Reach around flue to engage
bottom of duct with discharge
collar on hood. Tilt flue up against wall. Duct seam can be cut to length if necessary.
7. Extend the upper flue to the ceiling and secure with the 2 screws (C).
FASTEN FLUE TO
UPPER BRACKET
WITH SCREWS (C)
REDUCTION