


2
2 - 24
10. Compressor
W-2WAY ECO-i SYSTEM
Outdoor Unit Repair Procedures
10-2. Replacing the Compressor(s)
10-2-1. Replacing only the failed compressor
(1) If backup operation is required, follow the instructions in “4. Backup Operation” and engage backup operation.
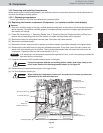
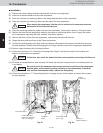
(2) Follow the instructions in “10-3. Removing and Installing Compressors” and replace the failed compressor.
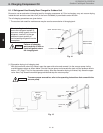
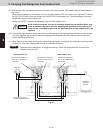
(3) Fully close the high- and low-pressure gauge valves on the manifold gauge, then stop the vacuum pump.
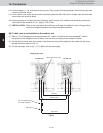
(4) Disconnect the manifold gauge from vacuum pump. Connect the manifold gauge to the cylinder where the
refrigerant was recovered. At this time, be careful that air does not enter the tubing.
(5) Open the valve on the refrigerant recovery cylinder and the high-pressure gauge valve on the manifold gauge
to charge with refrigerant. At this time, the low-pressure gauge valve on the manifold gauge remains fully
closed.
If the recovered refrigerant becomes mixed with another refrigerant or another gas
(such as nitrogen or air), do not use the recovered refrigerant for charging. Charge
with the designated amount of new refrigerant.
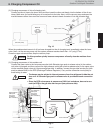
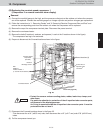
(6) When charging has been completed with an amount of new refrigerant equal to the amount of recovered
refrigerant, or when charging with the same amount of new refrigerant has not been completed but no more
refrigerant will enter the unit, fully close the high-pressure gauge valve on the manifold gauge. Next, turn the
power OFF at the repaired outdoor unit, then remove the short circuit at the AP pin (CN102). Finally, fully
open all valves on the gas tube, liquid tube, and balance tube.
However, leave the balance tube fully closed if only a single outdoor unit is installed.
(7) If backup operation was engaged, follow the instructions in “4. Backup Operation” and perform backup opera-
tion recovery.
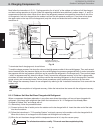
(8) If charging with an amount of new refrigerant equal to the amount of recovered refrigerant was not possible,
fully close the high-pressure gauge valve on the manifold gauge. Then, while the unit is operating in “5-2-1.
Cooling operation (for all units)”, open the low-pressure gauge valve on the manifold gauge and charge with
the designated amount of refrigerant.
When charging with liquid refrigerant, add refrigerant a little at a time in order to
prevent liquid back-flow.
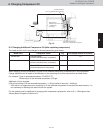
(9) Fully close the low-pressure gauge valves on the manifold gauge, follow the instructions in “8. Charging Com-
pressor Oil,” and charge with oil if necessary.
(10) Remove the manifold gauge.
The connecting port employs a Schrader-type push-to-release valve. When discon-
necting the hose, pressure will be applied from the refrigerant in the outdoor unit.
CAUTION
CAUTION
CAUTION