


INSTALLATION MODEL EZ-3 & EZ-5 COUNTERTOP STEAMERS
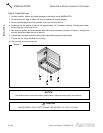
Step 4: Optional Floor Drain
The drain valve is 1/2" NPT. Position the unit near, but not on top of, an open floor drain. Allow at least a 1"
air gap.
DO NOT directly plumb to the unit unless you also install an “open funnel” downstream of this connection in
the drain system. The “open funnel” is intended to eliminate any water from entering the steamer because of
a blocked drain. Any connection that allows the build-up of back pressure in the unit (such as a reduction in
pipe size to a line smaller than 1/2"or a 90 degree angle in the line prior to the “open funnel” drain discharge
point) may cause personal or property damage and will therefore void the warranty. (See Figure 3.)
INSTALLATION
Figure 3
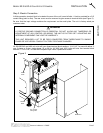
Step 5: Check Installation
The following items should be checked within the first 30 days of operation by a qualified service technician.
1. Check doors for proper alignment.
2. Ensure proper opening and closing of doors.
3. Open door and remove cavity bottom cover, if present.
4. Ensure that the light comes on when lever is set to the “ON” position.
5. Pour approximately 2 gallons of water into trough, ensuring that the cavity bottom is covered.
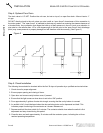
6. An audible “click” should be heard when the door switch actuator rod is depressed and held. This
indicates proper functioning of the contactor as it closes. Release rod.
7. Depress and hold the door switch for 2 minutes. The contactor should close when the switch is first
depressed and stay closed during this period.
8. Close the door and wait approximately 12 minutes until the contactor opens, indicating the unit has
reached operating temperature.
PAGE 8 OPERATOR’S MANUAL 1178387 REV 5