


14
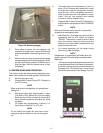
2. Remove the drip tray by gently lifting up to
disengage from the support and pulling out. Clean
behind the drip tray and front of the freezer with a
soap solution.
D. QUARTERLY
WARNING
High voltage will shock, burn or cause death. Turn
off and lock out main power disconnect before ser-
vicing. Do not operate machine with panels re-
moved.
The air-cooled condenser is a copper tube and aluminum
fin type. Condensing is totally dependent upon airflow. A
plugged condenser filter, condenser, or restrictions in the
louvered panel will restrict airflow. This will lower the
capacity of the system and damage the compressor.
The condenser must be kept clean of dirt and grease. The
freezer must have a minimum of 3” (7.5 cm) of ventilation
on the right and left sides of the unit for free flow of air.
Make sure the freezer is not pulling over 100° F (37° C) air
from other equipment in the area.
The water-cooled condenser is a tube and shell type. The
condenser needs a cool, clean supply of water to properly
cool the freezer, inlet and discharge lines must be 3/8” I.D.
minimum.
The condenser and condenser filter require periodic clean-
ing. To clean, refer to the following procedures.
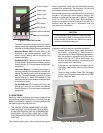
1. Remove the Phillips head screw from the bottom
of the right side panel, and then slide the panels
down and out.
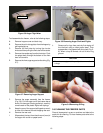
2. To remove the condenser filter, grasp the top and
pull off. Visually inspect for dirt. If the filter is dirty,
shake or brush excess dirt off the filter and wash
in warm, soapy water. Once the filter is clean rinse
thoroughly in warm, clear water and shake dry,
taking care not to damage the filter in any way
(Figure 28).
3. Visually inspect the condenser for dirt by shining
a light through the coil from the back (inside) of the
condenser.
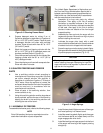
4. If the condenser is dirty, place a wet towel over the
front (outside) of the condenser.
5. Using a vacuum, carefully clean the condenser
coil from the inside and outside of the freezer. A
stiff bristled brush may help in releasing debris
from between the condenser coils.
E. SEMI-ANNUALLY
1. Check drive belt for proper tension. Push belt in
with one finger, belt should deflect about 3/8".
2. Lubricate condenser fan motor with S.A.E. 20
weight oil. Three to six drops is required.
CAUTION
Do not over-lubricate; resulting damage could cause
motor failure.
3.14 EXTENDED STORAGE
Refer to the following steps for storage of the freezer over
any long period of shutdown time:
A. Turn the Main Freezer Power OFF-ON switch to
the OFF position.
B. Disconnect (unplug) from the electrical supply
source.
C. Clean thoroughly with a warm water detergent all
parts that come in contact with the mix. Rinse in
clean water and dry parts. Do not sanitize.
NOTE
Do not let the cleaning solution stand in the hopper
or in the freezer barrel during the shutdown period.
D. Remove, disassemble and clean the front door,
mix inlet regulator and auger parts. Place the
auger flights and the front auger support bushing
in a plastic bag with a moist paper towel to prevent
them from becoming brittle.
E. In a water cooled freezer, disconnect water lines
and drain water. With a flathead screwdriver, hold
the water valve open and use compressed air to
clear the lines of any remaining water.
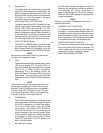
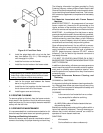
3.15 PRODUCT CONSISTENCY ADJUSTMENT
The IntelliTec control monitors the consistency (firmness)
of the product (mix) in the freezing cylinder by monitoring
the drive motor amp draw. When consistency is reached,
the drive motor and refrigeration system will shut off. The
control panel on the front of the freezer allows the operator
to adjust the freezing cylinder to create the desired product
consistency.
A. Place the FREEZING CYLINDER OFF/ON switch
in the ON position.
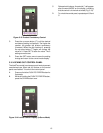
B. Press the SET button on the Control Panel once.
Fine Adj will appear on the LCD screen (Fig. 3-
12).