


21
ANCHOR THE UNIT
After door and side panels have been installed,
the unit has been leveled and door adjustment
c
ompleted, anchor the unit to the opening.
This will assure a proper fit and a secure
installation. The Sub-Zero Anchoring Kit (part
#
4200900), available from your Sub-Zero
dealer, includes the necessary hardware.
IMPORTANT NOTE:
Be sure to level and
square the unit before anchoring it.
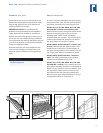
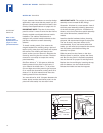
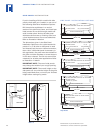
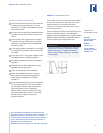
TWO UNITS ANCHORED TOGETHER
Drill three
13
/64" holes through the middle
trim of both units.
Using the Loctite on the screws, install the
three Chicago screw posts.
Recheck the units for level.
Drill three
3
/16" holes through both outer
trims. Refer to illustration 18 below.
Using a
1
/8" drill bit, drill into the cabinetry
for a pilot hole.
Install all six Sems to the cabinetry.
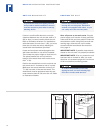
UNIT ANCHORED TO CABINETRY
First, make sure units have been leveled
and aligned, and doors adjusted.
Drill three
3
/16" holes through both outer
trims. Refer to illustration 19 below.
Drill a
1
/8" pilot hole into the cabinetry.
Install all six Sems.
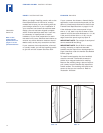
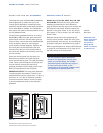
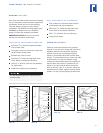
HINGE ADJUSTMENT
Check to make sure the doors are properly
aligned. If not, the door hinges will have to be
adjusted. Remove the two small shipping
screws from the top and bottom hinge as
shown in illustrations 20 and 21 below. Next,
using a
1
/8" allen head wrench, loosen the allen
head screws in the top and bottom hinge.
Loosen the allen head screws only slightly, so
that the door will remain in position as you
adjust it. You will now be able to move the
door to the left, right, or in and out. Once the
adjustments are made, tighten the allen head
screws—do not put the shipping screws back.
17
1
/8"(435)
17
1
/8"(435)
17
1
/8"(435)
17
1
/8"
(435)
17
1
/8"(435)
17
1
/8"(435)
17
1
/8"
(435)
17
1
/8"(435)
Illus. 18 Illus. 19
Illus. 20
Illus. 21
Do not drill through the model and serial
number plate.
COMPLETING THE INSTALLATION