


As you read theseInstallation Instructions, take
particular note of the CAUTION and WARNING
symbols when they appear.This information is
important forthe safe and efficientinstallation
of Sub-Zero equipment.
In addition, these Installation Instructionsmay
signalan IMPORTANT NOTE which highlights
information that is especiallyrelevant to a
problem-freeinstallation.
SUB-ZERO
®
is a registered trademark of Sub-Zero, Inc.
SUB-ZERO BUILT-IN REFRIGERATION
BUILT-IN INSTALLATION
The importance of the installation ofthe
S
ub-Zero Built-In unit cannot be overempha-
sized. Installation should be done by a qualified
installer.
Before you begin the installation process, it is
recommended that you read this entire Installa-
t
ion Instructions book. Thereare key details that
you should takespecial care to observe during
t
he installation. By reading these instructions
carefully, you will make the installation process
easier, problem-free and, most importantly, safe.
Any questions or problems about the installation
should be directed to your Sub-Zero dealer. You
can also visitour website at
subzero.com
.
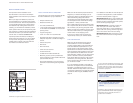
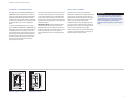
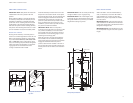
Important product information, including the
model and serial number of your unit are listed
on the product rating plate.The rating plateis
located at the top frame of the unit inside the
door. Refer to the illustration below.
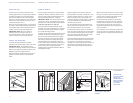
Make sure that the actualequipment that was
s
hipped to you matches the design you are
expecting to install.The Sub-Zero Built-In line
offers the following design alternatives—
overlay/flush inset and stainless steelmodels.
The overlay/flush insetmodel has two design
applications—overlay and flush inset.
Each of these designoptions has specific instal-
l
ation requirements, which means it is vital that
the unit match your planning and space needs.
Before you begin the installation process, check
the exact modelnumber you need against the
model number on the shipping carton.
If the unit you receive does not match your
requirements, contact yourSub-Zero dealer.
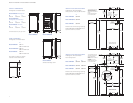
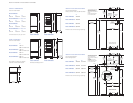
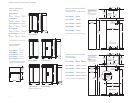
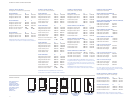
SITE PREPARATION
Make sure that the finished roughopening
where the Built-In unit is to be installed is
properly prepared. Refer to the Overall Dimen-
sions and Installation Specifications for your
specific model on the followingpages. These
specifications areidentical for the overlay/flush
inset and stainless steel applications. The instal-
lation specifications are different for the flush
inset application, whether you are using custom
panels or Sub-Zero accessorystainless flush
inset panels. Make sure that the rough opening
dimensions, door swing clearance, electrical
service and plumbingare correct for the model
you are about to install.
If you are installing two Built-In units side by
side in the overlay/flush inset or stainless steel
application, a separating fillerstrip is recom-
mended. Add the filler strip width to the finished
rough opening dimension. Complete theinstalla-
tion with the Anchoring Kit (7004656). Refer to
page 16.
For installation of two Built-In units side by side
i
n the flush insetapplication, a dual installation
kit will be necessary. Refer to page 15.
IMPORTANT NOTE:
Built-in units installed side
by side in the flush inset application cannot use
Sub-Zero accessory stainless flush inset panels,
a
nd must have opposing hinges.
IMPORTANT NOTE:
To operateproperly, the
d
oor must open a minimum of 90°. Use a
minimum 76 mm filler in corner installations to
assure a 90° door opening. Allow enoughclear-
ance in front of the unit for full door swing.
IMPORTANT NOTE:
Make sure the floor under
the unit is level with the surrounding finished
floor.
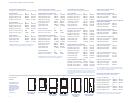
TOOLS AND MATERIALS REQUIRED
T
he following isa list of tools and materials that
should be available for proper installation.
• Phillips screwdriver set
• Slotted screwdriver set
• Torx drivescrewdriver set
• 1.2 m of 6,35 copper tubing and saddlevalve
for the water line (4200880)—do not use self-
piercing valves
• Copper tubing cutter
• Level—.6 m and 1.2 m recommended
• Appliance Dollyable to support 317 kg and
adequate manpower to handle the weight of
the unit
• Various sized pliers
• Wrench set
• Allen wrench set
• 8 mm hex bolt nut driver
• Crescent wrenches
• Cordless drill and assorted drillbits
• Masonite, plywood, 3,2 mm pressed fiber-
board, cardboard or other suitablematerial to
protect finished flooring
• Appropriate materials to cover and protect
the home and its furnishings during installa-
tion
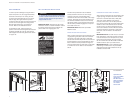
Ratingplate location
Location of
rating plate
signals a situation where minorinjury or
product damagemay occur if you do not
followinstructions.
CAUTION
statesa hazard that may cause serious
injuryor death if precautions are not
followed.
WARNING