


9
BUILT-IN INSTALLATION INSTRUCTIONS
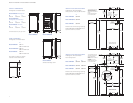
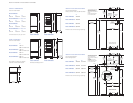
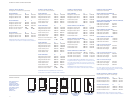
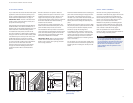
POSITION THE UNIT
Use anappliance dolly to move the unit near the
rough opening. Carefully moveitoff of the appli-
ance dolly. Each Built-In unitis equipped with
rollers, so it can be moved into position more
easily.
Shut off power to the electrical outlet. Plug the
power supply cord into the 15 amp grounded
outlet and roll the unit into position. Be sure that
the anti-tip bracket isproperly engaged.
IMPORTANT NOTE:
If possible, keep the door(s)
closed until the unit is properly anchored.
IMPORTANT NOTE:
If for any reasonthe unit
has been laid on its back or side, you must allow
the unit to stand upright for a minimum of 24
hours before connecting power.
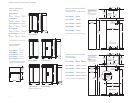
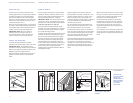
ANTI-TIP BRACKET
INSTALLATION
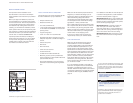
INSTALL CONCRETE WEDGE ANCHORS
1)
Drill a 10 mm diameter hole any depth
exceeding the minimum embedment. Clean
the hole or continuedrilling additional depth
t
o accommodate drill fines. Use a carbide drill
bit.
2)
Assemble the washer and nut flush with the
end of anchor to protect threads. Drive the
anchor through the material to be fastened
until the washer is flushwith the surface
material.
3)
Expand the anchor by tightening the nut
3–5 turns past hand-tight position or to 34
newton meters of torque.
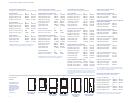
ANTI-TIP HARDWARE INCLUDED
2 Anti-Tip Brackets
12 #12 x 64 mm PH PanHD Zinc Screws
4 10 mm–16x 95 mm Wedge Anchors
12 #12 Flat Washers
4 #8–18 x 32 mm PH Truss HD Screws
4 Nylon Zip-ItWall Anchors
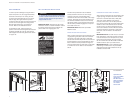
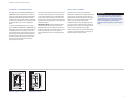
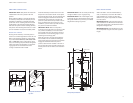
WATER LINE CONNECTION
Approximately .9 m of 6,35 mm plastic tubing is
c
onnected to the unit with a preassembled 6,35
mm compression connection at the end. This
tubing is located under the unit.
The water line fitting connection kit, provided
with the unit, contains a 6,35 mm compression
u
nion fitting for connection to the household
water line. Place the compression nut and sleeve
o
n the water line and fasten to the connection at
the end of the tubing under the unit. Do not over
tighten. Check all water line fittings for leaks.
Make sure that the drain pan can be installed or
removed without any water line interference.
IMPORTANT NOTE:
Be sure to purge the water
line prior to final connection to the unit. This will
remove any debris that may be present in the
tubing from installing the new water line.
IMPORTANT NOTE:
Let your customer know
that the ice maker will not produceice immedi-
ately, and that the first few batchesofice
produced shouldbediscarded. Allow 24 hours
for proper iceproduction.
IMPORTANT NOTE:
Caution must be taken not
to expose the refrigerator, and/or water lines
leading to the refrigerator, to freezing tempera-
tures. Failure to do so could causedamage to
the product andhome.
IMPORTANT NOTE:
This appliance shouldbe
connected to a potable water supply.
Protect anyfinishedflooringbefore moving
the unit into place. All Built-In models are
equipped with rollers, so you can easily
move the unit intoplace.
CAUTION
To reduce the possibility of the unit tipping
forward, the front leveling legsmust be in
contact with the floor.
WARNING
Make sure thatthere are no electricalwires
or plumbingin the areawhich the screws
could penetrate.
WARNING
Alwayswear safety glasses anduse other
necessary protective devices orapparel when
installing or workingwith anchors.
Anchors arenot recommended foruse in
lightweightmasonry material such as block
or brick, or for use in new concrete which has
not had sufficient timetocure. The use of
core drills is not recommended to drillholes
for the anchors.
CAUTION