


19
Model 161 Operating Procedures
Rinsing
Step 1
Pour onegallon (3.8 liters) of cool, clean water into the
mix hopper . With the brushes provided, scrub the mix
hopper, and the mix inlet hole.
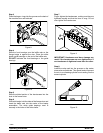
Step 2
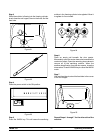
With a pail beneath the door spouts, press the W ASH
key and open the draw valves.
Step 3
Drain all the rinse water from the freezing cylinder.
When the rinse water stops flowing from the door
spout, close the draw valves and press the WASH key
to cancel.
Repeat this procedure until the rinse water being
drawn from the freezing cylinder is clear .
Repeat Steps 1 through 3 for the other side of the
machine.
Cleaning
Step 1
Prepare an approved 100 PPM cleaning solution
(examples: 2--1/2 gal. [9.5 liters] of Kay--5R or 2
gal. [7.6 liters] of Stera--SheenR). USE WARM WA-
TER AND FOLLOW THE MANUFACTURER’S
SPECIFICATIONS.
Step 2
Pour one gallon (3.8 liters) of cleaning solution into
the mix hopper and allow it to flow into the freezing
cylinder.
Step 3
While the solution is flowing into the freezing cylinder,
brush clean the mix hopper and the mix inlet hole.
Step 4
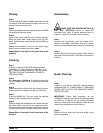
Press the WASH key. This will cause the cleaning
solution in the freezing cylinder to agitate.
Step 5
Place an empty pail beneath the door spouts and raise
the draw valve. Draw off all the c leaning solution.
When the solution stops flowing from the door spouts,
close the draw valves. Press the WASH key to cancel.
Repeat Steps 1 through 5 for the other side of the
machine.
Disassembly
MAKE SURE THE POWER SWITCH IS IN
THE “OFF” POSITION. Failure to follow this
instruction may result in severe personal injury to
fingers or hands from hazardous moving parts.
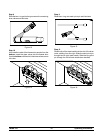
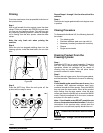
Step 1
Remove the handscrews and the freezer door.
Remove the beater assemblies from the freezing
cylinders and take these parts to the sink for cleaning.
Step 2
Remove the front drip tray, the splash shield, and the
drip pans from the machine. Take them to the sink for
cleaning.
Brush Cleaning
Step 1
Prepare a sink with an approved cleaning solution
(examples: Kay--5R or Stera--SheenR). USEWARM
W ATER AND FOLLOW THE MANUFACTURER’S
SPECIFICATIONS.
IMPORTANT: Follow label directions, as t oo
STRONG of a solution can cause parts damage, while
too MILD of a solution will not provide adequate
cleaning.) Make sure all brushes pr ovided with the
machine are available for brush cleaning.
Step 2
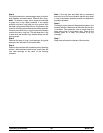
Remove the cup seals from the drive shafts of the
beater assemblies.