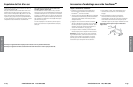
Your FoodSaver
®
Vacuum Sealing System has a special Quick
Marinate Cycle which will last about ten minutes. The FoodSaver
®
Quick Marinating Canister is the perfect FoodSaver
®
accessory for
marinating foods.
During the Marinate Cycle, the vacuum pump will “hold” the vacuum
for several minutes then release the vacuum, allowing the food to
“rest” for 30 seconds. This process then repeats. This “pulsing”
action of “vacuuming and resting” will allow for quicker more
flavorful marinating.
Important Note: Use the FoodSaver
®
during the Quick Marinate Cycle,
make sure knob on lid of the Quick Marinating Canister accessory is
set to OPEN. Do not set knob to Vacuum during the Marinate Cycle.
1. Prepare enough of your favorite marinade to fully cover food
inside a marinating canister.
Always leave at least one inch (2.54 centimeters) of space
between contents and top of rim.
2. Make sure rubber gasket underneath lids as well as rim
of marinating canister is free from food materials.
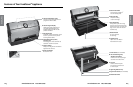
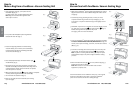
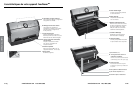
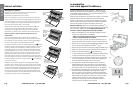
3. Make sure Retractable Accessory Hose (D) is securely inserted
into port on the FoodSaver
®
Quick Marinating Canister lid (Fig. 1).
4. Make sure knob on accessory lid is set to OPEN (Fig. 2).
5. Make sure lid is firmly attached to marinator base.
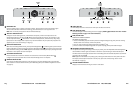
6. Press Marinate button
5
on the control panel (Fig. 3).
7. Your FoodSaver
®
Vacuum Sealing System will now begin the
Quick Marinate Cycle. The Marinate Indicator Light will flash
to indicate the marinating process has begun.
8. During the initial vacuum cycle the Marinate Mode Indicator
will illuminate. While Marinating, the Vacuum Progress
Display will blink during the Vacuum Hold or Rest Cycle.
9. To preserve food safely, after completing the marinating cycle,
the appliance will signal with short beeps to indicate your Quick
Marinate Cycle is completed. Press any button to silence the
signal. You may now cook or refrigerate your marinated food.
10. To use the Quick Marinating Canister to for extended vacuum
storage (beyond the short Marinate Cycle): Rotate knob to
Vacuum/Canister position, connect the Accessory hose (as
above) and select the Accessory Mode cycle from the control
panel. When motor turns off, rotate knob clockwise to the
“Closed” position, then gently twist and remove Accessory
Hose from accessory.
Marinating
with your FoodSaver
®
Appliance
MARINATEACCESSORY
SPEEDFOODCANCELON/OFF
SEAL
STOP
TRAY FULL
MOIST
DRY NORMAL
GENTLE
Fig. 3
Fig. 2
Fig. 1
F
F
5
HOW TO MARINATE
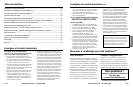
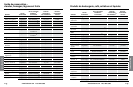
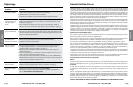
To Clean Appliance:
Press Power Button and remove Power Cord from electrical outlet.
Do not immerse in liquid.
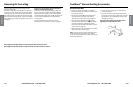
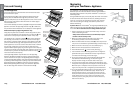
Open Appliance Door (K), while holding the appliance with two
hands, press two Release Buttons (J) with your thumbs, rotate
appliance away from you, and allow appliance to rest on the counter.
After cleaning, hold appliance with two hands and rotate upright
until the latches lock.
Check Lower Gasket (L) around Drip Tray (N) and Upper Foam Gasket
(P) which surrounds the Upper Bag Detection Tray (O) to make sure
they are free from food materials. Do not attempt to remove gaskets.
Antibacterial Drip Tray & Upper Bag Detection Tray:
Empty Drip Tray after each use. Wash in warm soapy water or place
in top rack of dishwasher. The Food Sensors in the Drip Tray (N) will
not function correctly if liquid is allowed to remain in Drip Tray.
This appliance has a Tray Full indicator
2
. When excess liquid fills
the Drip Tray, the unit will turn off and the Tray Full Indicator light
will activate. To resume normal operation, open Appliance Door (K),
press two release buttons (J), rotate appliance away from you, and
allow appliance to rest on the counter. Press tabs and lift to remove
the Drip Tray, empty liquid, clean Drip Tray and place back into
appliance. When replacing drip tray, set the right end of the drip tray
into place, then firmly snap both sides down. Appliance can be used
without Drip Tray, however the Adjustable Food Sensor setting
9
will
not function without the Drip Tray.
Clean Upper Bag Detection Tray after each use. The Upper Bag
Detection Tray (O) is removable for cleaning, remove by lifting the
tabs on each end. Do not pull on the Upper Bag Detection Flags to
remove the Upper Bag Detection Tray. Clean Upper Bag Detection Tray
by washing in warm soapy water or placing in top rack of dishwasher.
Upper Bag Detection Tray MUST be inserted to use the appliance.
Without the Upper Bag Detection Tray, your FoodSaver
®
Appliance
will not detect bag when inserted in the Vacuum Channel (E).
Care and Cleaning
CARE & CLEANING
Remove
Upper Bag
Detection Tray
& Lower Drip Tray.
Remove All Food
Around Gaskets
Push In
Tabs
Push In
Tabs
DO NOT
REMOVE
GASKETS
Replace
Upper Bag
Detection Tray
& Lower Drip Tray.
Rotate top to
close, shut
appliance
door
www.foodsaver.com 1-877-804-5383
EN-15
www.foodsaver.com 1-877-804-5383
EN-16