


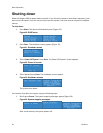

Easy Setup
24 ViewCast
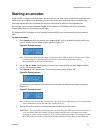
Performing the initial start up
The first time you power up the Niagara 4100, a series of menus appear on the LCD display that will
assist you in setting up the system clock, date, and video input format (NTSC (North America/Japan) or
PAL).
The steps below refer to a direct connection to the Niagara 4100 only.
To perform the initial start up:
1.
Ensure that you connect all devices (power cords, appliances, streaming devices, etc.) to the
Niagara 4100.
2.
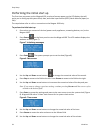
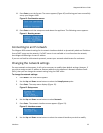
Press Power on the front panel to start the Niagara 4100. The LCD readout displays the
welcome screen (Figure 7).
Figure 7. Initializing messages
3.
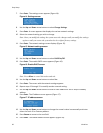
Press Enter . The system prompts you to set the date (Figure 8).
Figure 8. Date screen
4.
Use the Up and Down arrow buttons to change the numerical value of the month.
5.
Press Stop to move to the field to the left. Press Stream to move to the field to the right.
6.
Use the Up and Down arrow buttons to increment the numerical value of the day and year.
Note: If you want to change a previous setting, continue pressing Stream until the cursor cycles
around to the desired field.
7.
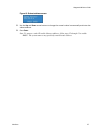
Press Enter to accept the settings and move to the next screen to set the system clock (Figure
9). Niagara 4100 uses a 24-hour clock format for its system clock entries.
Figure 9. Time screen
8.
Use the Up and Down arrow buttons to change the numerical value of the hour.
9.
Press Stream to enter the value and move to the Minute field.
10.
Use the Up and Down arrow buttons to change the numerical value of the minute.