


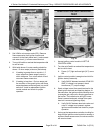


FILLING THE RESERVOIR JACKET
NOTE: The reservoir water level must be maintained
high enough to keep contact with the water level probe
(LLCO). If low water light comes on during use, the
visible level may be below the water level probe and
must be replenished before heating can continue. The
low water light will come on when kettle is tilted (tilting
models only).
When filling reservoir jacket, use only
distilled water and heat transfer fluid. The ratio is 67%
distilled water and the 33% heat transfer fluid.
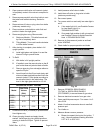
NOTE: Jacket fill port plumbing: A pipe elbow and
pipe plug are installed on current construction kettles
to open the fill port. A manual valve with knob was
installed on previous construction kettles to open the
fill port.
Partial Refill
1. Place kettle in full upright position (tilting models
only).
2. Turn power switch on.
A. If water level in sight glass is 1/3 full then
water level is ok.
B. If low water light is on, check to see if water
level in sight glass is below 1/4 full. If water
level is low, continue with procedure to refill.
3. Set temperature dial to lowest setting.
Pressure Relief Valve Exhaust. DO
NOT connect to building water, gas, or steam supply.
DO NOT block or restrict.
Hot steam. The kettle and its parts
are hot. Use care when operating, cleaning or
servicing the kettle.
4. Open pressure relief valve until reservoir jacket
is completely vented. Allow valve to snap shut to
seal.
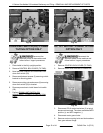
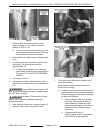
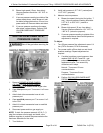
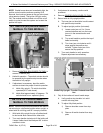
5. If installed, open the manual valve on the fill port
for the reservoir jacket at back of kettle.
A. Remove pipe plug from the valve/pipe elbow
to open the fill port.
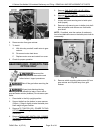
B. Insert funnel into the fill port and slowly add
water until the level in the sight glass is 1/3
full. Low water light should be off (LLCO
probe is satisfied). As necessary, vent the
air from the jacket as outlined below:
1) If pressure relief valve is installed at a
seperate location from the fill port (two
different openings in the jacket), open
the pressure relief valve to provide a
vent for the jacket air to escape and aid
in filling. Allow valve to snap shut to
seal.
2) If pressure relief valve and fill port are
installed on the same plumbing
assembly (single opening to the
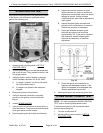
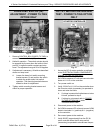
jacket), access the Pressure Switch
(1PS), remove the compression nut
from fitting near the tee and pull the
tubing from the fitting.
C. Turn power switch off.
6. Close manual valve (if installed) to prevent leaks.
Hand tighten only.
7. Clean pipe plug threads and apply thread
sealant. Install pipe plug into valve/pipe elbow
opening to close the fill port. Tighten to prevent
leaks.
8. Turn power switch on and verify low water light is
not lit.
A. If low water light is lit, see Possible Causes
for Low Water Light Lit in
TROUBLESHOOTING.
B. If low water light problem is still not resolved
see Possible Causes for Kettle Does Not
Heat in TROUBLESHOOTING.
9. Remove air from reservoir jacket as outlined
under VENTING.
10. Check kettle for proper operation.
Complete Draining and Refill
Disconnect the
electrical power to the machine and
follow lockout / tagout procedures.
Pressure Relief Valve Exhaust. DO
NOT connect to building water, gas, or steam supply.
DO NOT block or restrict.
Hot steam. The kettle and its parts
are hot. Use care when operating, cleaning or
servicing the kettle.
NOTE: Appearance of fluid will no longer be clear
after usage in kettle.
1. Set temperature dial to lowest setting.
K Series Gas Kettles 2/3 Jacketed Stationary and Tilting - SERVICE PROCEDURES AND ADJUSTMENTS
Page 21 of 44 F45461 Rev. A (0713)