


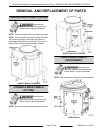
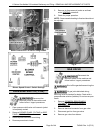
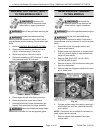

BOTTOM COVER
Disconnect the
electrical power to the machine and
follow lockout / tagout procedures.
NOTE: Remove screws from cover where indicated.
• Tilting models - tilt kettle to empty contents and
gain access to bottom components.
• Stationary models - use draw off valve to empty
contents.
• Raise the kettle for easier access to the
bottom components as necessary. Support
the kettle in some manner (2x4 blocks etc.)
while work is being performed.
K20GLT Manual Tilt Shown
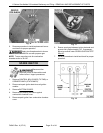
ELECTRICAL PANEL
COMPONENTS
Disconnect the
electrical power to the machine and
follow lockout / tagout procedures.
NOTE: Pictures show the electrical panel
components for a tilting kettle (control box & kettle
control area). On a stationary kettle, all the electrical
panel components are mounted in the kettle control
area.
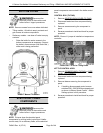
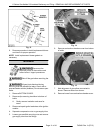
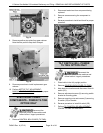
CONTROL BOX (TILTING)
1. Remove CONTROL BOX COVER (TILTING).
2. Disconnect lead wires from component being
replaced.
3. Remove screws securing the component to
panel.
4. Reverse procedure to install and check for proper
operation.
NOTE: Ensure J1 jumper is installed on temperature
controller.
Control Box - K Series Tilting Kettle
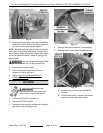
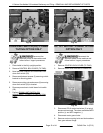
KETTLE CONTROL AREA
1. Remove CORNER PANEL (TILTING) or SIDE
PANEL (STATIONARY).
2. Disconnect lead wires from component being
replaced.
3. Remove fastener securing the component to
panel.
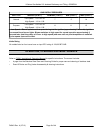
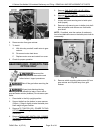
A. If installing blower speed control, ensure
switches SW1, SW2 & SW4 are properly set
as shown in Blower Speed Control - Switch
Settings picture in this procedure.
4. Reverse procedure to install and check for proper
operation.
K Series Gas Kettles 2/3 Jacketed Stationary and Tilting - REMOVAL AND REPLACEMENT OF PARTS
F45461 Rev. A (0713) Page 8 of 44