


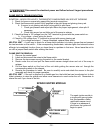
Disconnect the electrical power and follow lockout / tagout procedures
BURNER TROUBLESHOOTING
SYMPTOM – ALL BURNERS HAVE A LOWER OR HIGHER FLAME THAN NORMAL.
1. Check gas pressure
SYMPTOM – ONE OR MORE BURNERS HAVE LOWER FLAME LEVEL THAN THE OTHERS.
1. Check gas pressure
2. Check burner orifice for obstructions
3. Adjust burner air shutter
4. Check solenoid valve
SYMPTOM – ONE BURNER HAS A DELAYED IGNITION; A SEVERAL SECOND LAPSE BETWEEN
THE INDICATOR LIGHT TURING ON AND WHEN THE BURNER ACTUALLY LIGHTS.
1. Check gas pressure
2. Check that burner locater pin is properly seated with retaining clip attached
3. Check that burner ignition ports, pilot flash tube and pilot burner are all aligned.
4. Check burner shutter adjustment
5. Check pilot flame adjustment
6. Check thermostat and solenoid valve operation.
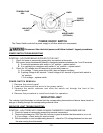
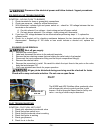
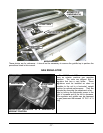
BURNER REMOVAL
Shut off gas supply
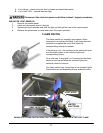
1. Remove the back panel
2. Reach through the back of the unit. Squeeze the burner retaining clip and slide off burner
retaining pin.
3. Lift the burner up so the retaining pin clears the corresponding hole in the chassis, then pull
the burner out through the back of the unit.
4. Replace by inserting the burner through the rear of the unit and engaging the burner venturi
onto the burner orifice at the front of the unit.
5. Seat the retaining pin in the hole in the chassis and attach the retaining clip.
6. Remove the control panel to check that the venturi is properly fitted over the orifice.
7. Reassemble the control and back panels, then check for proper operation.
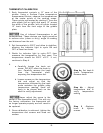
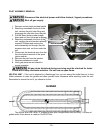
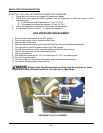
BURNER ADJUSTMENT
For efficient burner operation, it is important that a proper balance of gas volume and primary air
supply is maintained to give complete combustion. Insufficient air supply results in a yellow streaming
flame. Primary air supply is controlled by the air shutter on the front of the burner venturi. Loosen the
screw on the venturi and adjust the air shutter to just eliminate yellow tips on the burner flames. Lock
the air shutter in place in place by tightening the screw. Repeat this procedure as necessary with all
burners.
-
16 -