


3
3. MAKING BASIC WHITE BREAD
9 ounces lukewarm milk (1 cup + 2 tablespoons), about 80ºF
3 cups bread flour
1½ tablespoons sugar
1½ teaspoons salt
2 tablespoons butter or margarine
2 teaspoons active dry yeast
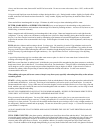
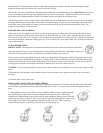
1. Put knead bar in bread pan over shaft. Twist if needed to slide down all the way.
2. Measure milk, warm gently and add to pan.
3. Measure bread flour, sugar and salt; add to pan. Level ingredients. Cut into four pieces. Place a piece in each corner on top
of dry ingredients.
4. Make shallow well in center of dry ingredients; add yeast. Lock pan into machine. See directional arrow on edge of pan for
which way to turn. Close cover.
4. PROGRAMMING CONTROL FOR MAKING BREAD
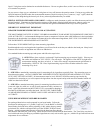
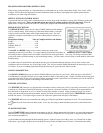
1. Plug cord into electrical outlet. Machine is already programmed for making Basic bread at the Medium crust setting. Red
lights will appear next to Basic and Medium settings.
2. Press Start/Stop button to turn machine on. Bread making process will begin. Bread will be done in 3 hours and 40
minutes.
3. When done, alert will sound and Keep Warm light will glow. Turn machine off by holding Start/Stop button down until
Keep Warm light goes out.
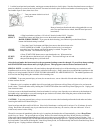
4. Unlock pan and remove with hot pads. Shake loaf out and place on rack to cool 15 to 30 minutes before slicing. Wash pan
following cleaning instructions in this book.
OTHER TIPS TO KEEP IN MIND WHEN USING YOUR BREAD MAKER
1. DO NOT REMOVE the bread pan or touch any moving parts when bread maker is in operation. If you need to stop the
bread maker during operation, hold the START/STOP button down for 3 seconds or until cycle light goes out.
2. BE SURE to allow adequate ventilation around the bread maker when it is in operation. Keep it out of drafts and direct
sunlight and at least 4 inches away from walls, cabinets and other appliances, especially heating and cooling appliances which
can interfere with the internal bread maker temperatures and affect the loaf of bread being prepared.
3. DO NOT IMMERSE base of bread pan in water or other liquid as this can damage the bearing on the bottom of the pan
that turns the knead bar. See cleaning section on page 14 in this booklet for further details.
4. ALWAYS place bread maker on a DRY, STABLE, heatproof countertop or table during use. Since the bread maker
contains a motor, some vibration occurs during the knead cycle.
5. AVOID touching bread maker during the bake cycle as exterior surfaces become hot. ALWAYS use potholders when
removing and handling the bread pan after baking.
6. FOLLOW instructions as given for best results. THE MOST IMPORTANT STEP IN BREAD MAKING IS TO
MEASURE INGREDIENTS ACCURATELY. See measuring section in this booklet on page 6.
7. DO NOT EXCEED the ingredient capacity of the bread maker. See “Know Your Ingredients: section in this booklet on
pages 4 through 6. Use only fresh ingredients.
8. ALWAYS ADD INGREDIENTS in the order listed in the recipes. Add liquid ingredients to the bread pan first, followed
by dry ingredients, then butter or margarine and finally the yeast in the very center. Before adding the yeast, ALWAYS tap the
pan to settle the dry ingredients, then level off the ingredients, pushing into the corners to prevent liquid from seeping up.
Then add the yeast to the very center of the pan, making a slight well in the center of the dry ingredients. This sequence is very
important, especially when using the delay start timer of your bread maker to prevent over fermentation of the yeast.
9. IN THE EVENT OF A POWER OUTAGE, the bread maker will turn off automatically and remain off when power is
restored. If this occurs, you will need to remove the contents from the bread pan and start over using fresh ingredients. When
machine is not operating, no lights will glow in cycle column. If in time delay mode, no light will glow in time delay column if
machine is not operating.
10. DO NOT COVER bread maker with anything during operation as this can cause malfunction
.