


12
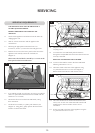
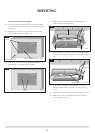
1.31 Tilt the heater casing forward and carefully remove the
heater assembly (see Diagram 12).
12
AR2398
1.32 Disconnect the 4 x coloured wires running from the firebox
to the heater assembly (see Diagram 13) noting their orienta-
tion.
13
AR2399
Disconnect wires
Disconnect
wires
1.33 Fit new heater assembly, ensuring all wires are correctly
attached and the heater is secured to its casing using 4 x
screws.
1.34 Reattach heater casing to bottom of firebox using 5 x screws.
1.35 Relocate the stove to its original position and replace any
loose top plates or panels.
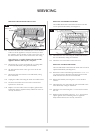
REPLACING THE HEATER ASSEMBLY
1.28 To access the heater assembly remove any loose top plates
or panels before moving the stove and carefully lay the stove
on its back.
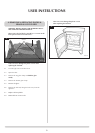
1.29 Remove the 5 x screws securing the heater casing to the
bottom of the firebox (see Diagram 10).
10
AR2397
Screws
Heater Assembly Case
Bottom of Firebox
1.30 Remove the 4 x screws from the front of the heater casing
(see Diagram 11) to free the heater assembly.
11
AR2397
Screws
SERVICING