System Administrator Screens
40 312353B
Adding a New Tank using a TLM
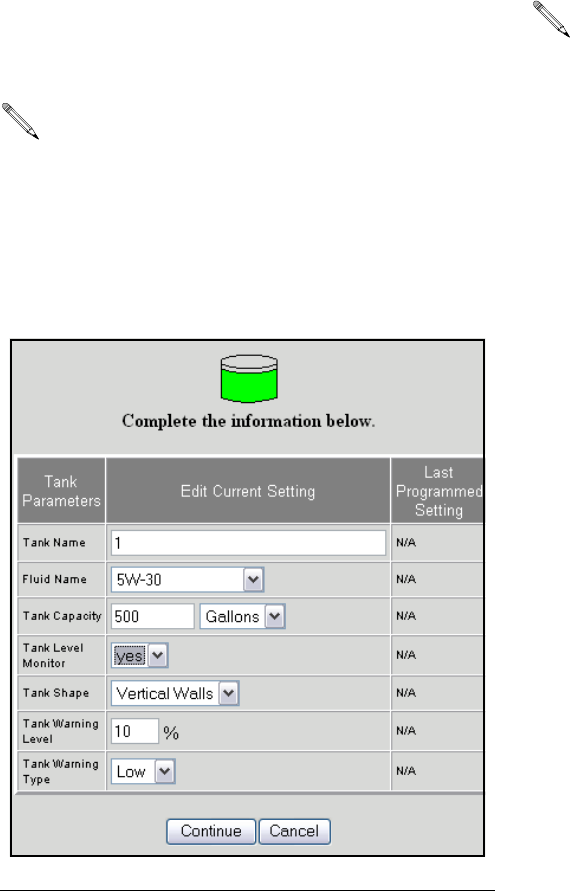
1. Click Add Tank. A new blank record is added. Tanks
must be setup and programmed prior to meters
being setup (F
IG. 74).
2. Select modify for the newly added tank
3. Tank Name: select and name the tank
.
4. Fluid Name: select any type of service fluid from
the drop down list.
5. Tank Capacity: fill in the tank capacity and select a
measurement (i.e. 500 gallons).
6. Tank Level Monitor: select yes if you plan to use a
Tank Level Monitor (TLM) on the tank and No if you
don’t plan to use one. If yes, you will be prompted
for additional information about this tank.
7. Tank Shape: select either vertical walls, cylinder, or
obround. See page 41 for information regarding
tank shape.
8. Tank Warning Level: default is 10%, but can be
changed as required. The monitor will send a low or
high tank level warning screen to the PC when the
tank level reaches 10% capacity, alerting the Sys-
tem Administrator that the tank level is low and
needs more fluid or high and must be evacuated.
9. Tank Warning Type: the Low setting is for new ser-
vice fluids and the High setting is for used oil tanks.
This field is alpha/numeric. For 1 - 99 TLMs use
the following numbering 01, 02, 03, … 09. For 100
- 999 TLMs use the following numbering 001, 002,
003, … 010, 011, 012. This ensures the tanks will
be listed in the correct sequence in the Matrix sys-
tem. To avoid issues with the reporting function, do
not use commas in data fields.
F
IG. 74 Edit Tank Setup
Vertical wall tanks use this capacity figure to calcu-
late tank volume. Make certain the value is accu-
rate. The tanks of other shapes calculate capacity
based on user-entered dimensions.
