


Clearspan OpEasy® Basic Provisioning User Guide R4.0 Aastra – 2827-006
2014 Clearspan® is a Registered Trademark of Aastra Technologies Ltd. Page 21 of 34
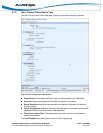
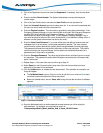
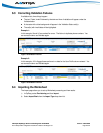
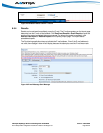
4) Click in the Department column and select the Department, if necessary, from the drop-down
list.
5) Enter an available Phone Number. The System Administrator must provide the phone
number range.
6) Click in the User Profile column and select the User Profile from the drop-down list.
7) Select the Voicemail Account type from the drop-down list. If no voice mail is associated with
this user, the column does not have a drop-down list.
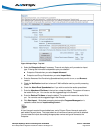
8) Enter the Physical Location. This information is provided by the system administrator. If the
Emergency Gateway Manager is in use, then this field must contain the Emergency Response
Location (ERL) that is defined in the Emergency Gateway. In this case, the System
Administrator will assist in providing the ERL. If the Emergency Gateway Manager is not in
use, enter the physical location of this user’s phone device (i.e. the address, building, office, or
whatever rule the system administrator has set for this value.).
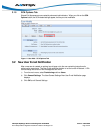
9) Enter the Voice Portal Password. If your user will be given the ability to retrieve voice mail
messages from his or her phone, a voice portal password is required. The value must be
numeric and the system administrator typically sets the length between four and eight digits.
This password is entered from the phone to allow entry to the voice mail portal. This portal is
used for more than just voice mail access; for this reason, the worksheet allows entry of a
password even if voice mail is not enabled.
10) Enter the Clearspan Password. The value can be alphanumeric and the minimum is usually
six characters. This password is used to allow Clearspan user access to the Clearspan web
portal, if authorized.
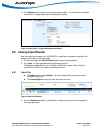
11) Repeat Steps 1-10 to enter other users, and then go to Step 12.
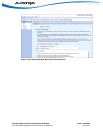
12) Select Done from the Command column drop-down list on the last row when you have
entered all of the users for this worksheet.
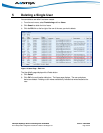
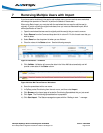
13) Click the Validate button to validate the user data entered. If the validation is successful, two
things will happen.
The Validation Status column, Column A on the far left of the row, will show Ok for each
row where a command (other than Done) was issued.
Below the Validate button, the text “Pass, valid” along with the date and time of validation
appears.
Figure 17 Worksheet Validated
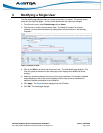
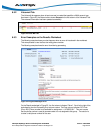
14) Save the Worksheet locally to another descriptive name because you will be using this
worksheet later. For example, you might want to save it as
“ClearspanImportBasic_Marsh_Hawkes_Add_3_Users_20140410.xlsm”.