


8
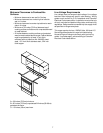
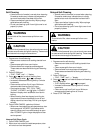
Anti-tip Bracket Installation
To reduce risk of range tipping, secure range with a
properly installed anti-tip bracket.
1. Remove storage drawer from range.
• See “Removing Storage Drawer” section.
2. Unscrew leveling legs so when range is moved into
position range top clears counter top.
• Left or right rear leveling leg must extend at least ¼
inch (6mm) to engage bracket.
• Anti-tip bracket can be installed on either right or left
rear leveling leg.
or
3. Move range to where it will be installed.
4. Position anti-tip bracket.
• With range in position, reach through storage
drawer opening and slide anti-tip bracket on either
left or right rear leveling leg. Slide leg into V-shaped
notch in bracket.
5. Mark location of side and front of anti-tip bracket on
floor.
6. Remove anti-tip bracket and range from opening.
7. Position anti-tip bracket according to lines marked on
floor.
8. Mark 2 hole locations in anti-tip bracket.
9. Drill 2 holes.
• If drilling into wood, use a
3
/32 inch drill bit.
• If drilling into concrete, use a
3
/16 inch masonry drill
bit and insert plastic anchors.
10. Secure bracket to floor using screws supplied.
11. Slide range into position.
• See “Level Range” section of manual.
12. Confirm anti-tip bracket is engaged with range leveling
leg and replace storage drawer.
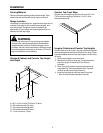
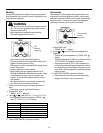
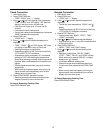
Power Supply Location
Shaded areas show range clearance for electrical
connection. Power cord is supplied with range.
A
B
C
D
A—3 inches (7.6cm)
B—7 inches (17.8cm)
C—6 inches (15.2cm)
D—30
1
/8 to 30¼ inches (76.5cm to 76.8cm)