


Page 7
PLUMBING HOOK UP
1. Flush the water line and securely attach it to the inlet fitting at the bottom rear of the brewer.
2. Turn on the water supply.
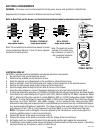
PLUMBING REQUIREMENTS
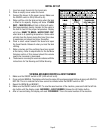
This brewer must be connected to a cold water system with operating pressure between 20 and 90 psi (138
and 620 kPa) from a
1
⁄2" (12.7 mm) or larger supply line. A shut-off valve should be installed in the line before
the brewer. Install a regulator in the line when pressure is greater than 90 psi (620 kPa) to reduce it to 50 psi
(345 kPa). The water inlet fitting is
1
⁄4" (6.35 mm) flare.
NOTE - Bunn-O-Matic recommends
1
⁄4" (6.35 mm) copper tubing for installations of less than 25 feet (7.62 m) and
3
⁄8" (9.5 mm) for more than 25 feet (7.62 m) from the
1
⁄2" (12.7) water supply line. A tight coil of copper tubing
in the water line will facilitate moving the brewer to clean the counter top. Bunn-O-Matic does not recommend
the use of a saddle valve to install the brewer. The size and shape of the hole made in the supply line by this type
of device may restrict water flow.
36748 101505
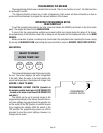
TANK DRAIN
1. Remove back access cover.
2. Close the white clamp on the drain hose.
3.
Unfasten the hose clamp at the inlet valve. Remove the hose from the valve.
4. Place the end of the drain hose in a container that has a minimum capacity of 2.0 gallons (7.5 liters).
5. Release the white clamp to drain the water from the tank.
6.
When tank is empty, leave the white clamp open, and install the hose back on the valve. Tighten the hose
clamp at the end of the hose around the valve fitting.
7. Replace the back access cover.
This equipment must be installed to comply with the Basic Plumbing Code of the Building
Officials and Code Administrators International, Inc. (BOCA) and the Food Service Sanita-
tion Manual of the Food and Drug Administration (FDA). For models installed outside the
U.S.A., you must comply with the applicable Plumbing/Sanitation Code for your area.