


22
SERVICE (CONT.)
Compressor (Cont.)
Removal and Replacement:
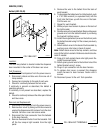
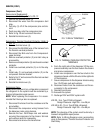
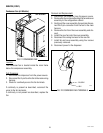
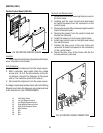
Compressor Start Relay: Refer to FIG. 16
1. Remove the terminal cover (4)
2. Disconnect the wires from the compressor start
relay.
3. Pull relay (1) off of the compressor pins and dis-
card.
4. Push new relay onto the compressor pins.
5. Refer to Fig. 16 and reconnect the wires.
6. Reinstall terminal cover (4).
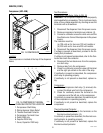
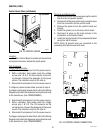
Compressor Thermal Overload Protector: Refer to
FIG. 16
1. Remove terminal cover (4).
2. Disconnect the WHI/ORN wire of the harness from
the thermal overload protector.
3. Disconnect the BLK wire from the Compressor’s
upper terminal.
4. Remove overload protector (3) and start relay as
an assembly.
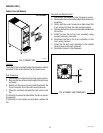
5. Remove overload protector (3) and discard overload
protector.
6. Install new overload protector (3) on to the relay
(1).
7. Install relay (1) and overload protector (2) on the
compressor terminal bracket.
8. Refer to Fig. 17 and reconnect the thermal overload
protector wires.
9. Reinstall terminal cover (4).
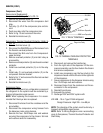
Compressor Assy:
NOTE: Before removal of any refrigeration component
the refrigerant in the system must be reclaimed by a
licensed refrigeration repair person.
NOTE: When replacing the compressor it is recom-
mended that the dryer also be replaced.
1. Disconnect the tubes from the condenser and the
accumulator.
2. Disconnect the compressor wiring harness from
the dispenser main wiring harness.
3. Remove the four .25-20 keps nuts and washers
securing the compressor to the chassis. Set nuts
and washers aside for reassembly.
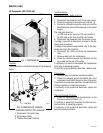
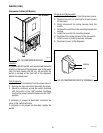
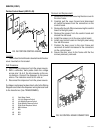
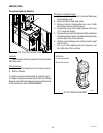
FIG. 17 RELAY TERMINALS
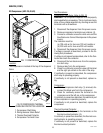
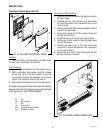
FIG. 18 THERMAL OVERLOAD PROTECTOR
TERMINALS
Plugs into Relay
4. Disconnect and remove the transformer.
5. From the right side of the dispenser lift the com-
pressor assembly over the four studs in the chassis
and remove compressor.
6. Install new compressor over the four studs in the
dispenser chassis with the fill valve to the right side
of the dispenser.
7. Secure compressor to the dispenser chassis using
four .25-20 keps nuts and washers.
8. Reconnect tubes from the condenser and the ac-
cumulator to the compressor.
9. Reinstall transformer.
10. Evacuate the system.
11. Recharge 120V and 230V system with:
JDF-4SB - 10 oz. Type R134A refrigerant.
Design Pressures: High 335 - Low 88 psi
NOTE: The charging of the system must be done by a
licensed refrigeration repair person.
NOTE: Refer to Wiring Diagrams when reconnecting
wires to Compressor, Thermal Overload Protector and
Start Relay.
BLU/BLK
GRN
WHI
BLU from Capacitor
BRN from Capacitor
49179 110613