


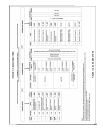
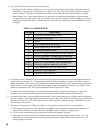

59
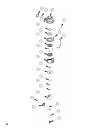
d. Remove the ignition electrode and inspect it for oxides. Clean the oxides off the electrode with sandpaper. Inspect
the ceramic insulator for cracks and replace the ignitor assembly if necessary.
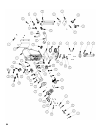
e. Remove the fan/gas valve assembly from the burner hood. Inspect for lint and dust. If signifi cant lint and dust are
found, disassemble the fan/gas valve assembly to expose the swirlplate and fan inlet (see the exploded diagram in
the parts list at the back of this manual). Vacuum these parts as required, being careful not to damage the vanes on
the swirlplate.
f. Remove the burner hood to access the burner and the combustion chamber.
g. Remove the burner and vacuum any dust or lint from the burner. If the burner shows signs of deterioration or
corrosion, replace it immediately. Inspect the burner gasket and replace, if necessary.
h. Inspect the heat exchanger and vacuum any debris found on the pins and other surfaces. Clean the casting pins by
fl ushing with clean water. A soft nylon brush may be used in accessible areas. Drain and fl ush the inside of the heat
exchanger and condensate collector as required. Do not use any cleaning agents or solvents.
i. Inspect the condensate trap to verify it is open and free from debris. Clean if necessary.
j. Reinstall the burner, burner hood and fan/gas valve assembly.
k. Reconnect any wiring which has been disconnected.
l. Inspect the heating system and correct any other defi ciencies prior to restarting the boiler.
m. Follow Section XI Start-up and Checkout instructions before leaving installation.
n. Perform the combustion test outlined in Section XI.
o. Verify that the system PH is between 6.5 and 8.5.
p. Check for vent terminal obstructions and clean as necessary.