


Title
Rev 1.00A
Installation & Operation
Model EAH / EC Dishwasher
01/26/04
Page 17
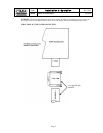
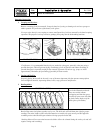
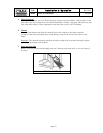
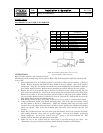
Door Handle Conversion EC to EAH #00617.20
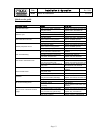
ITEM
NO.
NO.
REQ’D
P/N DESCRIPTION
1 2 00603.20 Door Spring Extension Rod
2 1 00613.09 Door Handle
3 1 00926.00 5/16” SS Washer
4 1 01555.50 L.H. Door Handle Support
5 1 01556.50 R.H. Door Handle Support
6 2 00607.04 Door Handle Cap 1”
7 4 00924.00 ¼” SS Washer
8 2 00900.00 Cotter Pin
9 4 00912.00 ¼” 20 Nylon Lock Nut
10 4 00962.00 ¼”-20 x 1 SS Hex Head Bolt
11 1 00603.20 Eye Bolt
12 2 01505.32 Tray Track Inline AH
INSTRUCTIONS:
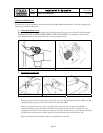
1. Open dishmachine doors to their highest position so that there is little spring resistance on the door
handle. Remove hardware holding the door handle to the door linkage. Save all the washers and
spacers. With the door handle in “UP” position, lift spring and remove from extension rod. Remove the
nut attaching the eyebolt and save all hardware.
2. To remove the door handle, simply unscrew the four bolts holding the door handle mounting plates and
slide the complete assembly up and off of the cabinet. Use the bolts, nuts and washers to plug the holes
in the back of the cabinet.
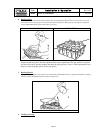
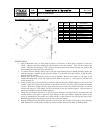
3. Remove door panel & hardware from left side of machine. Remove door guides on the front of the
cabinet and mount them on left side of the machine. Remove tray track ( c ) and replace it with the track
in line from the kit.
4. Using provided nuts, bolts and washers; mount the left and right door handle supports on the back of the
cabinet. Insert the eyebolt into the bracket on the frame and screw the nuts on just enough to hold them
in place. Hook door spring and door spring extension rod on to the door handle and secure it with the
washer and cotter pin. Then simply rest the door handle on the door handle supports. (You may have to
lift the door handle to reach the handle supports.)
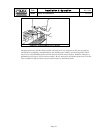
5. Swing the door handle downwards to reach the door linkages; and using the two provided bolts and
existing washers and spacers, attach the door linkages to the door handle. Adjust the tension in the
spring by tightening the nuts under the eyebolt bracket so that the doors can slide up and down freely.
Mount the provided door handle grips on the ends of the door handle.
6. Eyebolt adjustment nuts should be adjusted to the point the doors begin to lift from a closed position.
SEE “Illustration” for the proper location of all door handle hardware included on EAH machine.