9
ASSEMBLY
BLENDING ATTACHMENT
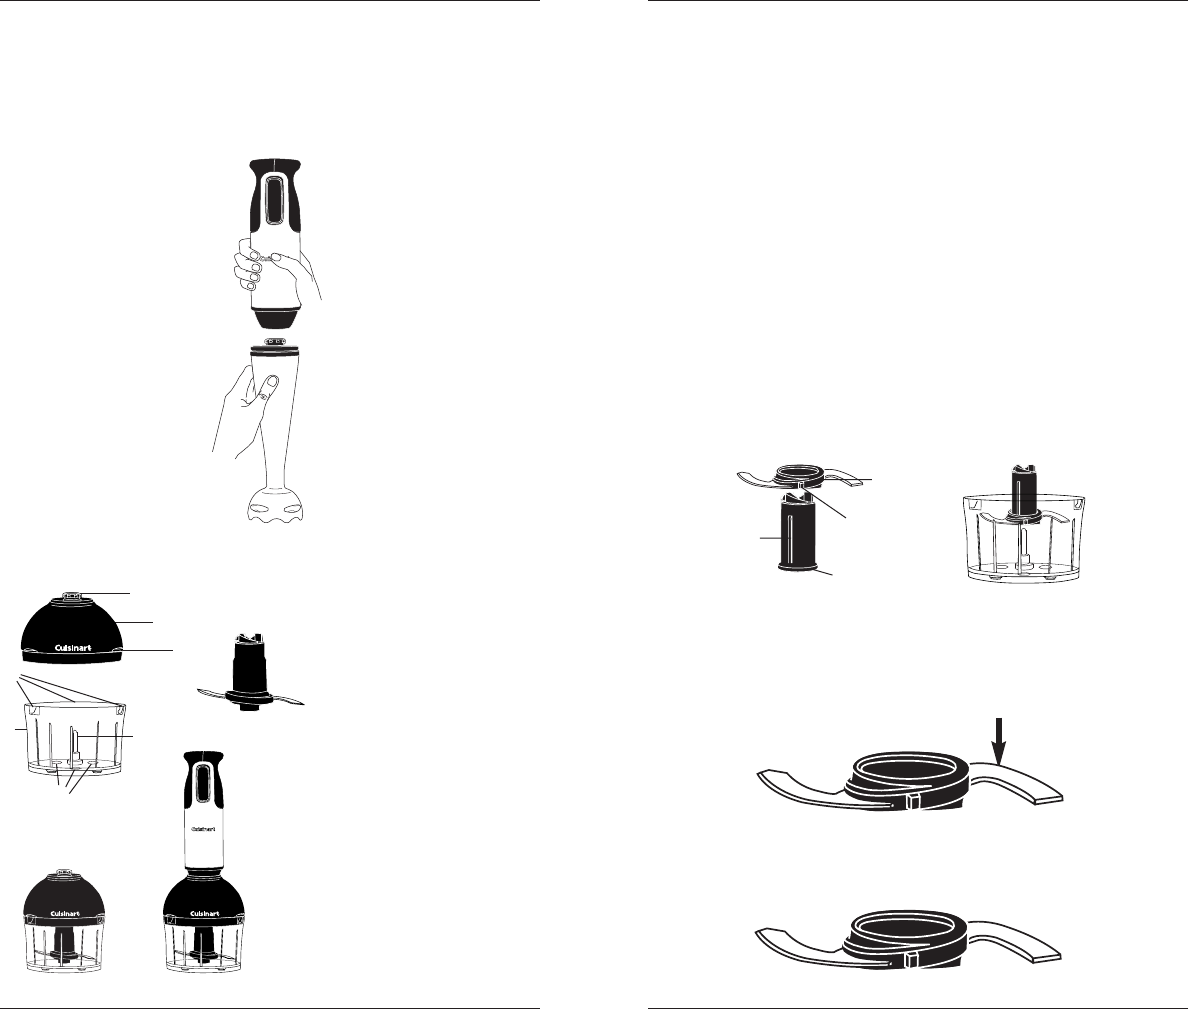
1. Align the motor body with the blending attachment and slide the
pieces together until you hear and feel the pieces click together.
It may be helpful to press the release button when assembling.
CHOPPER/GRINDER ATTACHMENT
8
REVERSIBLE BLADE
The Cuisinart
®
Smart Stick
®
Hand Blender chopper/grinder attachment is
equipped with a reversible blade. This blade is sharp on one side and
blunt on the other. The blade is attached to a plastic ring which slides
over the blade assembly shaft, so it can be easily turned over to select
the appropriate blade. A guide for proper blade selection follows in the
section, Frequent Uses for Chopper/Grinder (page 15.)
Before you process any food, assemble the parts.
1. Place the prep bowl on a flat, dry, stable surface. It should be close to
an electrical outlet of the same voltage as stated on the rating plate on
the Smart Stick
®
Hand Blender.
2. The metal blade assembly shaft is attached to the bottom of the prep
bowl. If not already in place, slide the fully assembled blade assembly
over the top of the blade assembly shaft.
a. Putting together the blade assembly:
Connect the blade ring (F) to the plastic blade sheath (G). Line up the
blade ring opening with the plastic sheath. Let the blade ring slide to
the bottom of the plastic sheath. HOLD THE BLADE RING BY THE
CENTRAL HUB HOLDING RIBS (grips)(K) ONLY. DO NOT TOUCH
THE RAZOR-SHARP BLADES.
Note these important features of the blade ring. The blade ring can be
placed over the plastic blade sheath in two different ways:
If you hold it this way (A), you will see the word “Sharp” on the blade.
Assemble the blade this side up to use the sharp edge. (see the section
on processing food for information about when to use the sharp edge.)
If you hold it this way (B), you will see no writing on the blade.
Assemble the blade this side up to use the blunt edge.
(See the section on processing food, for information about when
to use the blunt edge.)
A. Chopper/Grinder
Prep Bowl
B. Cover Slots (3)
for Attaching
Cover
C. Metal Blade
Assembly Shaft
D. Rubber Feet
E. Blade Assembly
F. Blade Ring
G. Plastic Blade
Sheath
H. Chopper/Grinder
Cover
I. Lift Tabs
J. Chopper/Grinder
Spline
A
B
C
D
J
H
I
E
F
G
N
F
G
K
2a
A.
SHARP SIDE
B.
BLUNT SIDE UP
CSB-77C_IB_BILINGUAL 11/2/04 4:00 PM Page 8


