


19
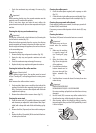
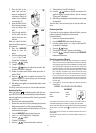
5. Place the lter in the
water tank and sub-
merge it completely for
ten seconds, tilting it to
enable the air bubbles
to escape (g. 39).
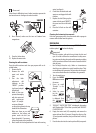
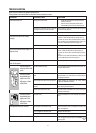
6. Insert the lter into the
lter housing and press
as far as it will go (g.
40A).
7. Close the tank with the
lid (g. 40B), and then
replace the tank in the
machine.
When you install the lter,
you must notify the appliance
of its presence.
8. Press the MENU/ESC
button to enter the
menu;
9. Press the scrolling arrow
(< or >) (g. 9) until
“Install lter” is displayed.
10. Press the button.
11. “Install?” is displayed;
12. Press the button to conrm the selection. “Wa-
ter delivery Press OK” is displayed.
13. Position a container under the hot water spout (min. ca-
pacity: 100 ml).
14. Press the button to conrm the selection. The
appliance begins hot water delivery and the message
“Please wait” is displayed.
15. After delivery, the appliance is automatically ready to make
the next drink.
The lter is now active and you can use the coee machine.
Replacing the lter
When the symbol “ ” is displayed together with the mes-
sage “REPLACE FILTER”, after two months (see date indicator) or
when the appliance has not been used for 3 weeks, you should
replace the lter:
1. Extract the tank and exhausted lter;
2. Remove the new lter from the packaging and proceed
following steps from 2 to 6 of the paragraph before.
3. Position a container with a minimum capacity of 100 ml
under the hot water spout.
4. Press the MENU/ESC button to enter the menu;
5. Press < or > until “Replace lter” is displayed.
6. Press the button;
7. “Conrm?” is displayed;
8. Press the button to conrm the selection;
9. “Water delivery, Press OK” is displayed.
10. Press the button to conrm the selection. The
appliance begins hot water delivery and the message
“Please wait” is displayed.
11. After delivery, the appliance is automatically ready to make
the next drink.
The new lter is now active and you can use the coee ma-
chine.
Removing the lter
If you want to use the appliance without the lter, you must
remove it and notify the appliance of its removal.
Proceed as follows:
1. Extract the tank and exhausted lter;
2. Press the MENU/ESC button to enter the menu;
3. Press the scrolling arrow (< or >) (g. 9) until “Install l-
ter, Installed” is displayed.
4. Press the button;
5. The message “Uninstall?” appears on the display;
6. Press the button to conrm and the MENU/ESC
button to exit the menu.
Electrical connection (UK only)
A)
If your appliance comes tted with a plug, it will incorporate a 13 Amp fuse.
If it does not t your socket, the plug should be cut o from the mains lead,
and an appropriate plug tted, as below. WARNING: Very carefully dispose
of the cut o plug after removing the fuse: do not insert in a 13 Amp socket
elsewhere in the house as this could cause a shock hazard. With alternative
plugs not incorporating a fuse, the circuit must be protected by a 15 Amp
fuse. If the plug is a moulded-on type, the fuse cover must be re-tted
when changing the fuse using a 13 Amp Asta approved fuse to BS 1362.
In the event of losing the fuse cover, the plug must NOT be used until a
replacement fuse cover can be obtained from your nearest electrical dealer.
The colour of the correct replacement fuse cover is that as marked on the
base of the plug.
B)
If your appliance is not tted with a plug, please follow the instructions
provided below:
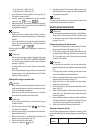
WARNING - THIS APPLIANCE MUST BE EARTHED
IMPORTANT
GREEN AND YELLOW EARTH
BLUE NEUTRAL
BROWN LIVE
As the colours of the wires in the mains lead may not correspond with the col-
oured markings identifying the terminals in your plug, proceed as follows:
The green and yellow wire must be connected to the terminal in the plug marked
with the letter E or the earth symbol or coloured green or green and yel-
low.
The blue wire must be connected to the terminal marked with the letter N or
coloured black.
The brown wire must be connected to the terminal marked with the letter L or
coloured red.
37
39
40A
40B
37
39
40A
40B