


NOTES
34
· This appliance must not be installed on a wooden
base.
· The dimensions given provide adequate air
circulation around the unit within the cabinet,
ensuring compliance with BS EN30.
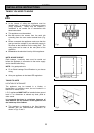
GETTING THINGS READY
PREPARING CABINET FOR FITTING OVEN
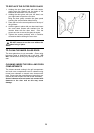
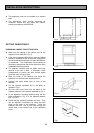
· Make sure the cabinet is the correct size for the
appliance to be fitted (Ref. Fig. 4).
· If the size is between 605-610mm, then the cabinet
should be modified so that at the screw fixing points
the recommended dimension of at least 600-605mm
is maintained. The modification should ideally be
localised to ensure that after screw fitment the oven
is securely fixed into position.
· The adjacent cabinets must be stable and firmly
secured to the wall or floor. If necessary, make
arrangements to ensure the work surface below
which the oven will rest is level.
· Mark the centre of the aperture into which the
appliance is to be fitted onto the plinth board.
· Remove the plinth board from in front of the
cabinets.
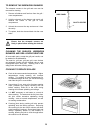
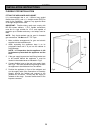
· Cut the required ventilation slot in the plinth as
detailed in Fig.5.
· Drill two pilot screw holes into the sides of the
adjacent cabinets, in the position indicated by Fig. 4.
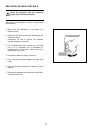
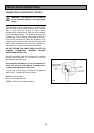
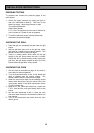
· Fit the appliance mounting brackets using the two
holes indicated in Fig. 6 to the adjacent cabinets
(Ref. Fig.4 & 7).
· Check that the mounting brackets are level. They
can be adjusted if necessary by using the extra
holes at the ends of the brackets. Once the
brackets are level, drill a pilot hole through the
central hole in the bracket and fit the remaining
screw.
INSTALLATION INSTRUCTIONS
Fig.4
Fi
g
.5
Fig. 6
Fig.7