


How tcpUse the Hold/Timer
I
L
L
1’
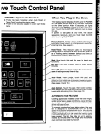
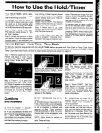
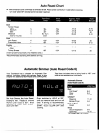
Your HOLD/TIMER, which qper-
ates without microwave enqrgy,
has three timing functions.
It operates as a Minute Tim$r, it
can be set to delay cooking or may
be used as a hold setting after
defrosting. Hold/Timer can b@set
up to 99 minutes and 99 secorids.
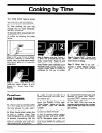
step ~: Touch HOLD/TIMER pad.
The read-out panel shows :0. “’En-
ter Time” flashes.
Step 2: Select the amount of ~ime
you desire. Touch the appropriate
number pads. If, for example, you
are timing a three minute phone
call, touch 3, 0 and O.The readout
panel shows 3:00 and “HOLD”
appears on display.
Step 3: Touch START. The readout
display shows the time as it counts
down, and “Hold Time Left”.
Step <.: When time is up, oven
sounds. The readout flashes “END”
and the timer turns off.
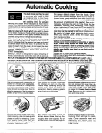
The HOLD/TIMER can also be
used to program “standing time”
between microwave cooking func-
tions. The time can range from one
second to 99 minutes and 99 sec-
onds. A HOLD, or “standing” time
may be found in some of your own
recipes or Cookbook.
To set the oven to delay cooking
up to 99 minutes follow Steps 1
and 2 to enter hold time, then set
time or temperature desired before
pressing START. When holding be-
fore temperature cooking, be sure
probe is in food before pressing
START.
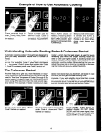
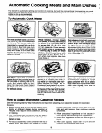
i!%! %2De?rosi—Hoiti/Time-Time cook
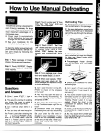
To help you become acquainted with the HOLD/TIMER feature as used with Time Cook or Temp Cook follow
Steps below to defrost a frozen casserole for 15 minutes, then hold 10 minutes and then cook 25 minutes. if using
Temp Cook after Hold/Timer, be sure to insert probe correctly as shown on page 14.
s@ ::
Remove casserole from the
freezer and place in oven. Touch
the DEFROST pad. The readout
panel shows “Enter Def Time”, :0,
and Dower 3.
Step 3: Set standing or hold time
by touching HOLD/TIMER. “Enter
Time” and :0 appear on dispiay.
Step 2: Touch 1, 5, 0 and O ,for
defrosting time. Def Time, 15]00,
and Power 3 appear on the dis~lay
panel. (Defrosting is automatically
set on Power Level 3 but can be
changed by touching POWIER
LEVEL pad and the new Power
Level.)
Step 4: Touch 1, 0, 0, and Oto hold
for ten minutes. 10:00 and “HOLD”
appear on the display.
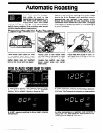
lum~
Step 5: Touch the TIME COOK
pad. The display shows “Enter
Cook Time”, :0, and Power 10
(HIGH).
Step 6: Touch 2, 5, 0, and O for
twenty-five minutes of cooking
time. “Cook Time”, 25:00, and
Power 10 appear on the dis-
play panel.
Step 7: Touch START. “Def Time
Left”, Power 3, and 15:00 counting
down show on display. As each
function is automatically per-
formed oven display shows en-
tered information.
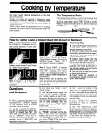
GkEstims
and Answers
C). WVhatW;!! happe- !f ; ~cc~~~:-
r
n tha iacJ~:~c~j~~s7
:a!!v rwe. se ... -,4,
A. ‘If you accidentally reverse the
seol tence of programming instruc-
tic your oven automatically
rearranges your program. Defrcpst-
ing always comes first, then hc$ld,
and then the cooking function.
Q. Can ! 3ekost-Ho!ci oniy on T.y
7
Sverl .
A. Sometimes you may want to de-
frost a food, hold it, and refrigerate
it to be cooked later. All you need
to do is program in Defrost and
amount of time. Then program
Hold and amount of time. Put your
thawed dish in the refrigerator and
cook later at a convenient time.
NOTE: Allow foods to remain at
room temperature only as long as
safe. Times will vary.
n;
u. 1 prograx-eci
my even for a
Spedfic defrosting time but it de-
f:~sted lon~er t’nan necessary.
What happened?
A. When instructions conflict,
the
oven carries out the last instruc-
tion. You may have set the oven to
Defrost for 4 minutes, Hold/Time
for 2 minutes, and then Defrost for
6 minutes. In this case, the oven
would Defrost for 6 minutes and
Hold/Time for 2 minutes.
11
———
_———